
Quick Answer: Monstera root rot is caused by overwatering and dense soil, which suffocates roots and breeds fungal pathogens like Pythium. To fix it, immediately unpot the plant, carefully trim all mushy black roots, cleanse the remaining system with diluted hydrogen peroxide, and rehab in water or repot into a chunky, airy aroid mix to restore oxygen flow.
There is no sight more disheartening to a dedicated plant parent than the dreaded “Black Spot.” I remember waking up one morning to find a dark, expanding blotch on one of my beautiful, fenestrated leaves. It wasn’t a crisp, dry brown spot; it was a mushy, black lesion surrounded by a sickly yellow halo. I touched the soil, and it was wet. I touched the stem, and it felt dangerously soft, like an overripe banana that was about to turn into mush. This wasn’t sunburn. This was monstera root rot.
If you are reading this, you are likely in the middle of a crisis. This fungal issue is the primary cause of loss for Monstera deliciosa. Unlike a simple lack of light or humidity, which are common issues in general Monstera deliciosa care, root rot destroys from the inside out. It destroys the vascular system, cutting off the plant’s ability to drink. That is why a rotting plant often looks droopy and thirsty—it is essentially fading from thirst in the middle of a swamp.
I have been exactly where you are. I once lost a stunning variegated specimen because I hesitated to check the roots. But through that failure and years of trial and error, I developed a rescue protocol that focuses on aggressive action rather than passive hope. This guide is your emergency action plan. I am going to walk you through exactly how to identify the rot, precisely remove it, and use a clean water vessel to bring your plant back from the brink.
Is your monstera showing these signs?
- Mushy Stems: Is the base of the plant soft or squishy to the touch?
- Foul Smell: Does the soil smell like rotten eggs or a stagnant swamp?
- Yellowing Leaves: Are lower leaves turning yellow rapidly while soil stays wet?
Don’t panic yet. If there is even one healthy node left, we can save it. Let’s get your hands dirty and start the work.
Table of Contents
The Assessment: Signs of Root Rot in Monstera
In my decade of battling fungal pathogens in tropical houseplants, I have learned that the earliest warning signals are never visual; they are tactile and olfactory. By the time you see massive monstera leaves turning yellow, the damage is already advanced. To catch this culprit, you must recognize the subtle signs of root rot in monstera well before the leaves begin to drop. It requires you to stop looking at the plant and start sensing it.
I rely on two specific assessment field tests that have never failed me. These are not scientific lab tests, but practical, hands-on methods that reveal the hidden health of the root system buried deep within the pot.
The “Sniff Test”
If you take nothing else from my experience, take this: healthy soil smells like a forest floor after a rain—earthy, rich, and clean. Rotting soil smells like a swamp. When I suspect monstera root rot, I lift the grower pot and place my nose directly against the drainage holes. I am looking for a specific scent profile that indicates anaerobic decay.
If you catch a whiff of rotten eggs or sulfur, rot is already consuming the roots. A damp, stagnant smell often indicates that you may have misjudged how often to water monstera, leaving the soil wet for too long and creating the prime breeding ground for Pythium.
The “Tug Test”
This is a delicate maneuver. I gently grasp the base of the thickest stem, right where it meets the soil line. I give it a very slight, upward tug—no more force than you would use to lift a teacup. In a healthy Monstera deliciosa, the plant should feel anchored, solid, and immovable. If the plant shifts easily or feels “loose” in the pot, your root system has been compromised. This lack of resistance is one of the definitive signs of root rot in monstera that most people ignore until the plant actually falls over.
Do your leaves look like this?
- Sweating Leaves: Are the tips dripping water excessively, even days after watering? This edema indicates the roots are under such immense pressure they are bursting.
- Dark Brown Spots: Unlike crisp dry edges, are the spots soft, dark brown, and ringed with a yellow halo?
- Moldy Topsoil: Is there a fuzzy white layer on the soil surface? That is the visible fruiting body of the fungus attacking your roots below.
Step 1: The Excavation and Rinse
Once you have confirmed the issue, you cannot wait. Fungal spread does not pause. The first step is what I call “The Excavation.” This is not a simple repotting; this is an emergency extraction. I have made the mistake of trying to be gentle here, keeping the old soil to “reduce shock.” That is a critical error. The old soil is now a contaminated waste hazard loaded with millions of fungal spores waiting to attack any new roots.
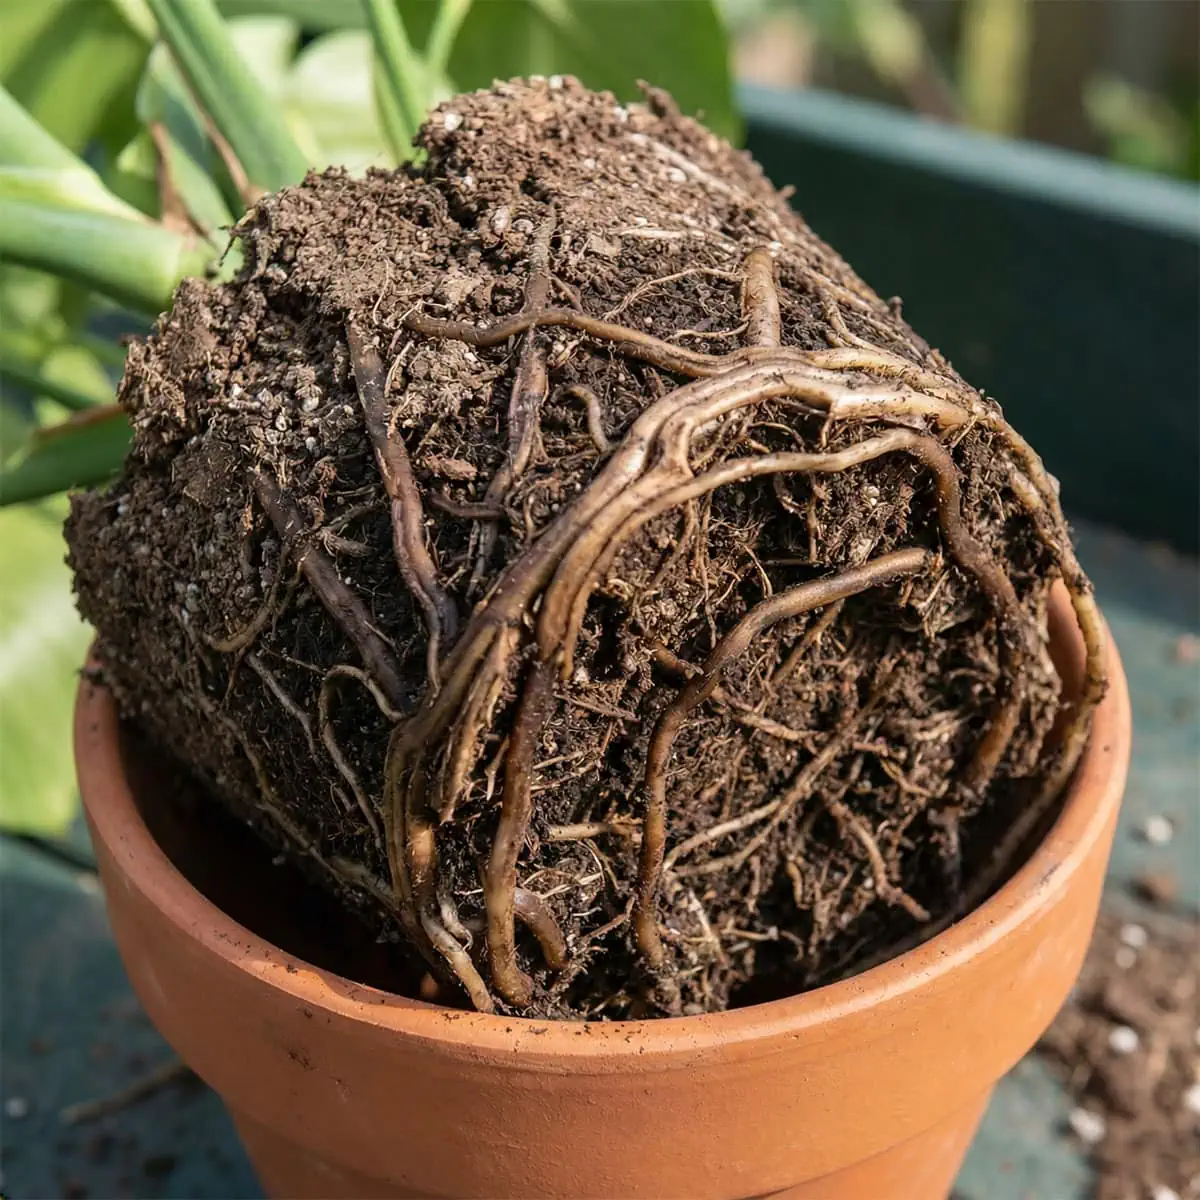
I lay down a tarp because this is going to be messy. I turn the pot on its side and gently tap the rim. Gravity is your friend here. Do not pull the plant out by the stem; if the roots are rotted, you might rip the stem right off the root ball. When I first see the root ball of a plant suffering from monstera root rot, it usually looks disheartening—a wet, dense, muddy cylinder that holds its shape like a heavy brick.
The Washing Protocol
You must remove 100% of the old soil. I take the plant to a sink and use a stream of lukewarm water to blast away the mud. I use my fingers to gently massage the root ball, working from the center outwards.
You will likely feel roots detaching and washing away with the soil. Do not panic. Those roots were already rotted; the soil was just holding them in place. It takes me about 15 minutes to fully rinse a large root ball. I am meticulous. I want to see the bare anatomy of the root system. Any speck of old soil could harbor the pathogen.
I keep rinsing until the water runs clear and I am left with a bare, tangled mess of roots. Only then can I truly see the extent of the battle we are fighting. It is often shocking to see how little viable root mass is left compared to the size of the canopy, but as long as there is a node, there is hope.
Step 2: How to Save Monstera from Root Rot: The Cleanup
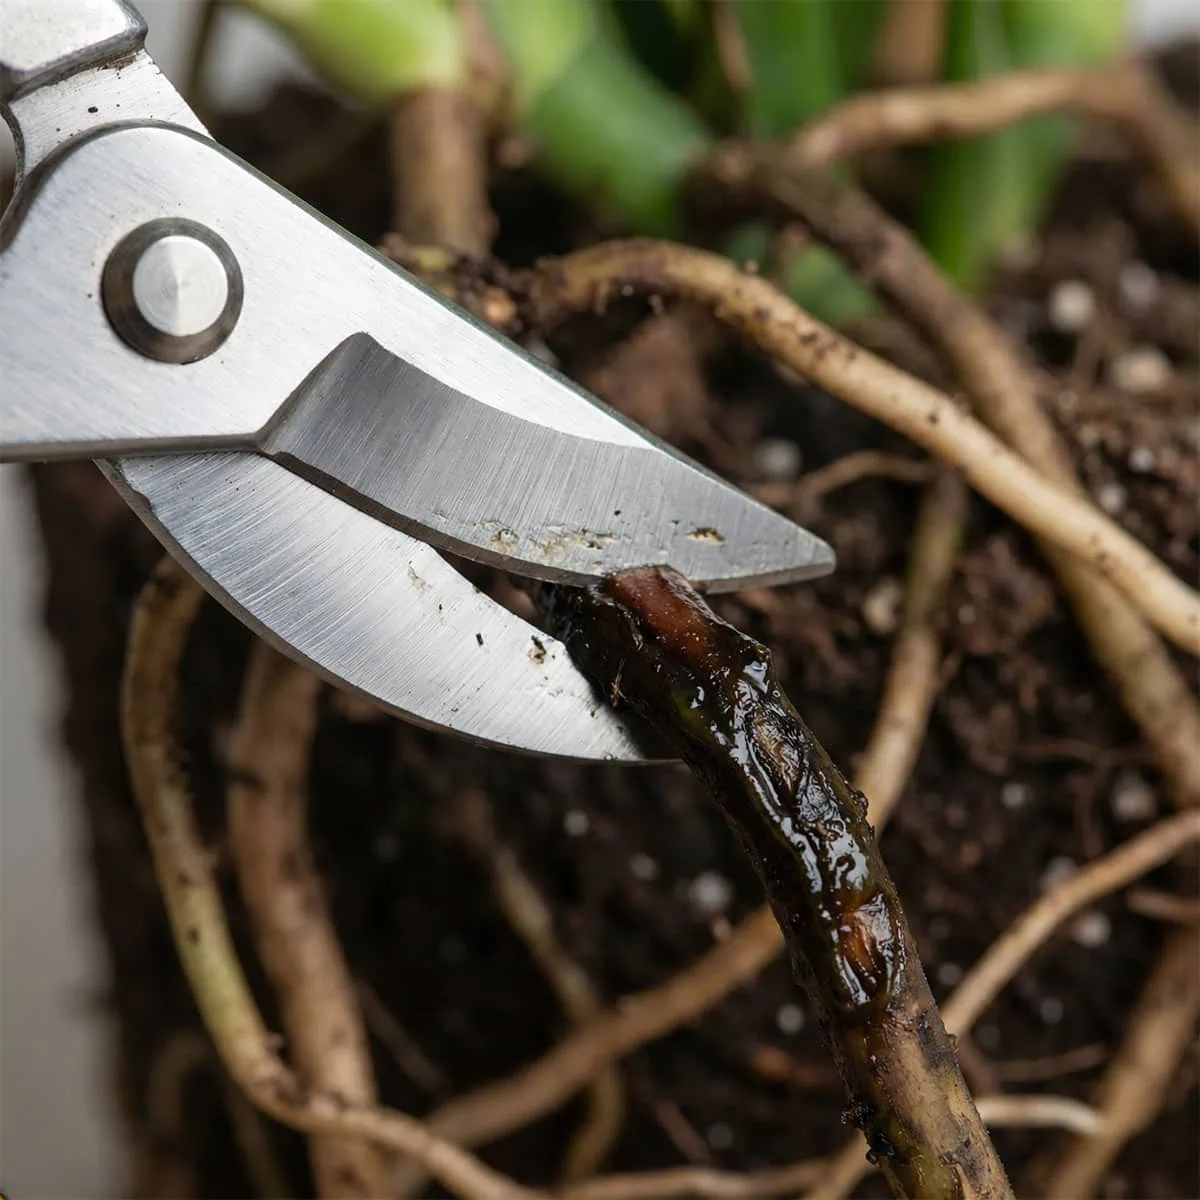
Now that the roots are exposed, we move to the most critical phase. When learning how to save monstera from root rot, you must be decisive and precise. There is no room for sentimentality here. There is no room for sentimentality here. Leaving even one millimeter of decayed tissue is like leaving decay behind during the cleaning process; it will spread again. I grab my sanitized pruning shears—I always wipe them with rubbing alcohol before and after every cut—and I start the inspection.
Identifying Healthy vs Rotted Monstera Roots
To the untrained eye, roots are just tangled strings, but there is a massive difference in texture and color. Knowing how to distinguish healthy vs rotted monstera roots is the skill that saves plants.
- The Healthy Root: These should be firm, plump, and creamy white or light tan. When you squeeze them, they should feel like a firm grape or a cooked green bean—solid and resistant.
- The Rotted Root: These are the enemy. They will be dark brown, black, or a sickly translucent gray. The texture is the giveaway. They feel mushy, slimy, and stringy. If you pull on one, the outer sheath will often slide right off, leaving behind a thin string. This is the classic “string test.”
The Cleaning Procedure
I start cutting. I trim away every single root that looks questionable. I cut at least one inch above the visible rot, cutting into the healthy white tissue to ensure I have removed the leading edge of the decay. It can be terrifying. I have had sessions where I had to cut away 90% of the root system, leaving the plant with nothing but a few aerial roots and a stump.
This drastic measure is the only way to halt monstera root rot in its tracks. It feels aggressive, but it is necessary. If you are trying to manage root rot monstera issues effectively, you must prioritize the health of the organism over the retention of biomass.
If the rot has traveled up the roots and entered the main stem, the situation is critical. You will see dark discoloration on the stem. In this case, I use a clean knife to carve out the rot from the stem. If the stem is mushy all the way through, you may have to propagate the top cuttings.
However, usually, the rot is confined to the feeder roots. I keep cutting until I see only clean, crisp, white flesh. We are stripping the plant down to its healthy core so it can rebuild without the burden of decay.
Step 3: The Monstera Root Rot Hydrogen Peroxide Fizz
Mechanical removal is not enough. Fungal spores are microscopic; they are hiding in the crevices of the remaining healthy roots. We need a cleaning step to sanitize the area. I use a solution of Hydrogen Peroxide and water. This is a controversial step in some circles, but in my experience, it is non-negotiable for advanced cases of monstera root rot.
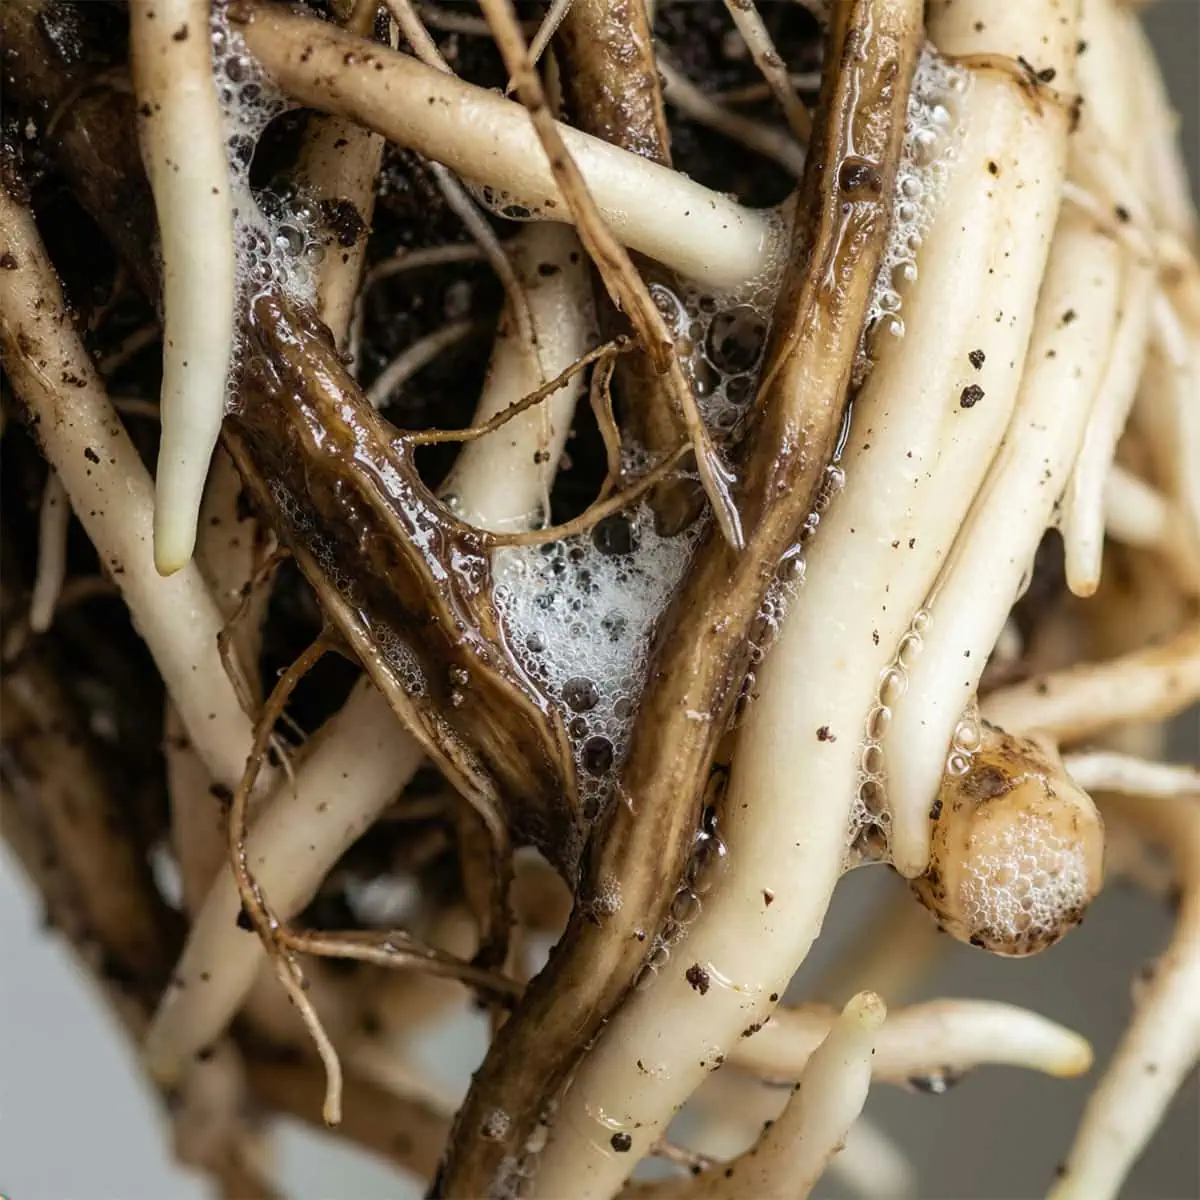
The Formula: To create a safe monstera root rot hydrogen peroxide bath, I mix one part 3% Hydrogen Peroxide with three parts water. You do not want to use it straight, as it can burn the healthy tissue, but a diluted mix is ideal.
I place the remaining root ball into a bowl and pour the solution over it. I let it sit for a few minutes. You will hear a distinct, audible fizzing. That sound is music to my ears. The fizzing is the oxygen being released as the peroxide attacks organic pathogens. It is literally obliterating the pathogens on contact. I watch the bubbles work, ensuring the solution reaches every nook and cranny.
After the fizzing slows down, I rinse the roots one last time with fresh water. This washes away the decayed cells and the residual peroxide. Some growers skip this rinse, but I prefer to start with a clean slate. At this point, your plant is effectively clean. It has no roots to drink water, but it also has no active rot eating it alive. It is in a state of suspended animation, ready for rehabilitation. This cleaning step is the bridge between the cleaning and the recovery.
Step 4: Monstera Root Rot Water Rehabilitation
Here is where many people fail. They take their freshly operated-on plant and shove it right back into soil. The plant is traumatized. Its ability to uptake water is compromised. Putting it back into dirt—even fresh dirt—introduces pathogens and uneven moisture that a weak root system cannot handle. I strictly recommend monstera root rot water propagation as the recovery zone for your plant.
Choosing the Vessel
I select a clear glass vase or jar. Why clear? Because I need to see the roots every single day without disturbing the plant. I fill it with distilled water. Tap water contains chlorine which can irritate the recovering cut sites. I place the plant in the vessel so that only the remaining roots and the very bottom of the node are submerged. The stem itself should stay as dry as possible to prevent stem rot. If you have aerial roots, submerge them too—they will quickly transition into water roots.
The Oxygen Exchange
The secret to successful monstera root rot water rehab is oxygen. Stagnant water breeds germs. I change the water every two days. Every single time I change the water, I rinse the vessel with soap and verify the roots. You are looking for new, white, fuzzy growth. These are water roots. They are fragile, but they are the sign of life returning.
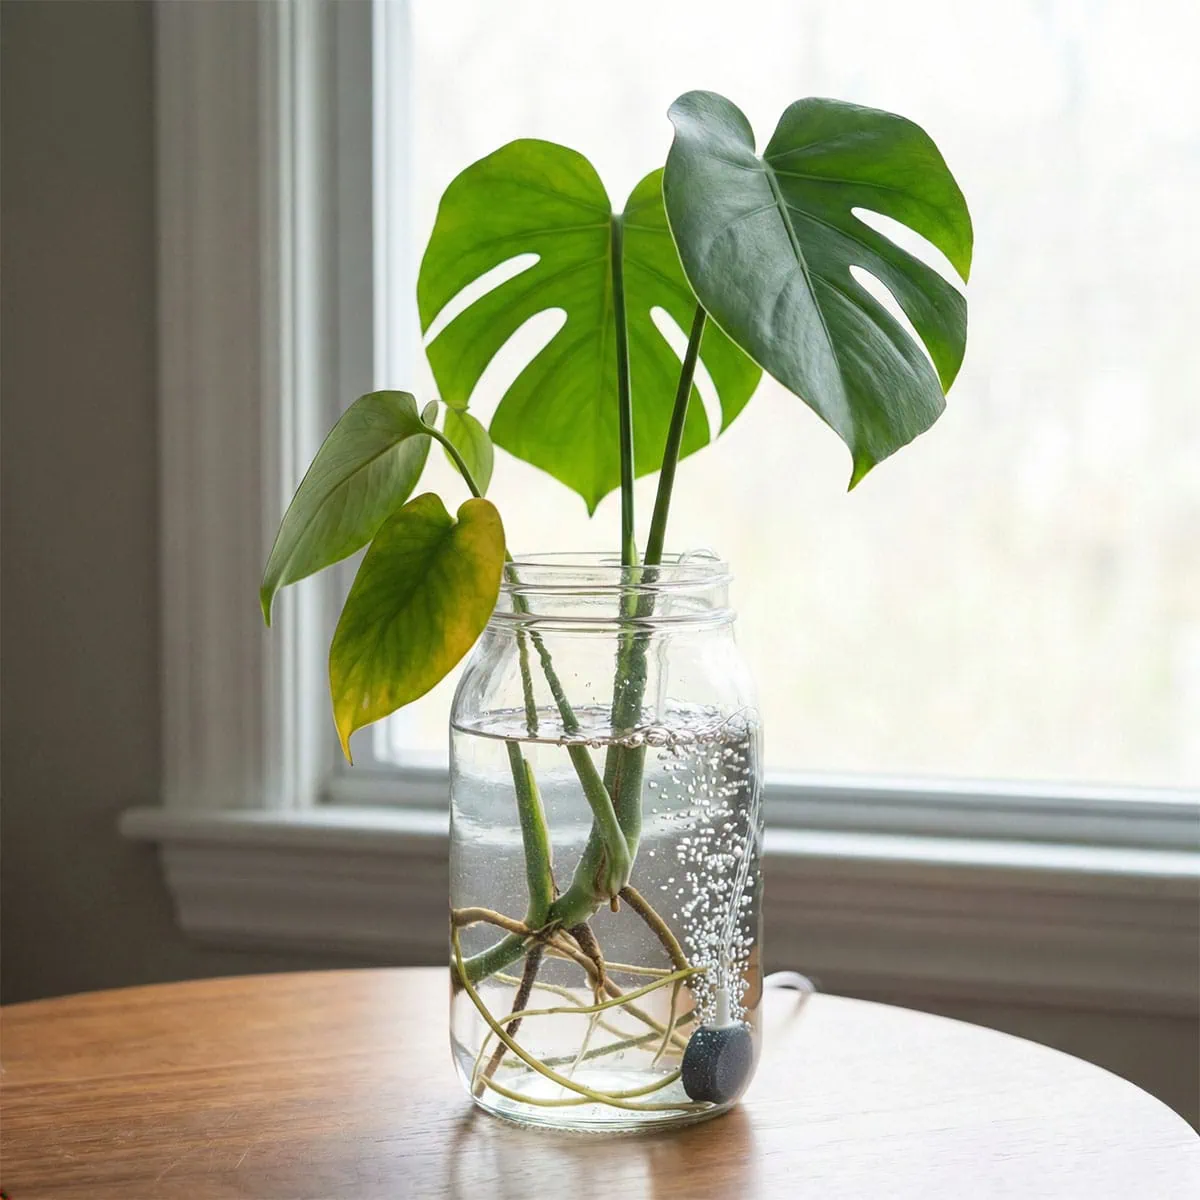
I also add an air stone to my larger rehab buckets. The constant bubbles keep the water highly oxygenated, which speeds up root growth significantly. During this phase, the plant might lose a leaf or two. Do not panic. It is cannibalizing older leaves to fuel root production. Let it happen. This phase is not about aesthetic beauty; it is about survival. I keep the plant in a bright, warm spot but strictly out of direct sunlight. Direct sun demands high water uptake, which the roots cannot provide yet, risking a relapse of monstera root rot.
Step 5: Repotting Monstera with Root Rot History
Patience is your currency here. You should keep your Monstera in Water Rehab until the new roots are at least 3 to 4 inches long and, crucially, have started branching. This usually takes 4 to 8 weeks. I have waited as long as three months. Do not rush.
When it is finally time for repotting monstera with root rot history, you must ensure you never repeat the mistake that got you here: soil density. Standard potting soil is a major problem for a recovering plant. It suffocates the new, tender roots.
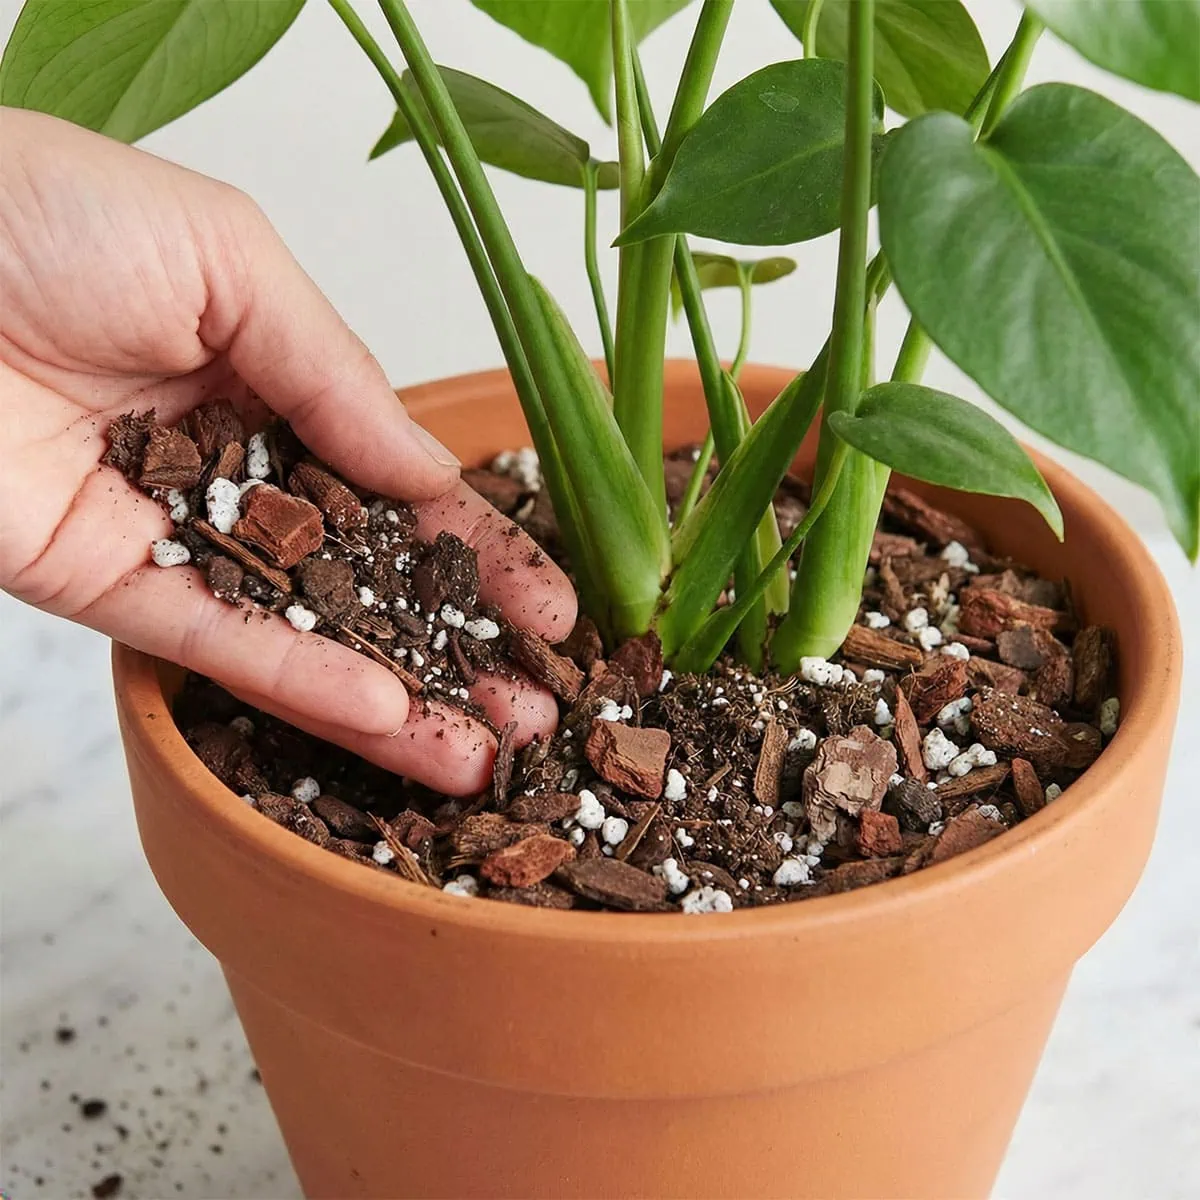
The “Aroid Life-Support” Mix
I mix my own substrate. I use a ratio that shocks most beginners because it looks more like a pile of forest floor debris than garden soil. You can check out my full recipe for the best soil for monstera for long-term growth, but for immediate rehab, my formula is:
- 30% Premium Potting Soil: This provides the structural foundation and essential minerals.
- 30% Chunky Orchid Bark: This creates massive air pockets for the roots to breathe.
- 20% Coco Chips or Coir: For moisture retention that mimics the humid rainforest floor.
- 10% Coarse Perlite: To ensure rapid drainage and prevent compaction.
- 10% Worm Castings: A gentle, organic fertilizer that won’t burn the new roots.
This mix is so chunky that water pours through it instantly. That is what you want. You want the roots to be humid, not wet. When you pot the plant, do not pack the soil down. Gently tap the sides of the pot to settle the mix. The roots need to breathe.
After repotting, I water it thoroughly once to settle the substrate, and then I wait. I verify the soil moisture daily with a finger test. Because this mix drains so well, you will need to water more frequently than with dense soil, but the risk of recurring monstera root rot is virtually eliminated. You have engineered an environment where the fungus simply cannot thrive.
For more detailed scientific information on identifying root pathogens in container plants, I recommend consulting this fact sheet on houseplant issues from Iowa State University, which explains the biology of fungal pathogens like Pythium in depth.
Frequently Asked Questions (FAQ)
Is monstera root rot always the end for the plant?
No, absolutely not. In my experience, even a stem with zero roots can survive if it has a healthy node. I once saved a plant that was just a wet stick by placing it in fresh water. The key is waiting; water propagation acts as a temporary survival zone. It might take two months, but eventually, new white roots will emerge, proving that monstera root rot is rarely a final loss if you act fast.
What are the first signs of root rot in monstera plants?
Long before the leaves turn yellow, your plant will speak to you through smell. I always perform a “sniff test” first. If the soil smells like a damp basement or rotten eggs, that is the microbes talking. Another clue is “sweating” leaves, where water droplets appear on tips without recent watering. These early signs of root rot in monstera are your signal to stop watering immediately and inspect the soil density for trapped moisture.
How can I fix root rot monstera cases without repotting?
Honestly, you cannot effectively resolve root rot monstera issues without taking the plant out of the pot. I have tried using fungicides as a soil drench, but they never reach the necrotic core in the center of the root ball. You must physically remove the rotting tissue. Leaving a rotting root in the soil is like leaving rotted tissue on a exposed cut; the decay will spread. You have to unpot, cut, and sanitize to stop the spread.
How long can a monstera survive in water while recovering?
My recovering plants often stay in water for three to four months. I prefer keeping them there until the new roots have secondary branching. Water is a sterile, controlled environment where oxygen is high if you change it often. I have never had a plant rot in water as long as I cleaned the vessel weekly. It gives the plant a break from soil pathogens and lets you monitor the recovery progress daily without disturbing sensitive growth.
Does hydrogen peroxide actually eliminate the good microbes too?
Yes, but that is a necessary sacrifice. When fighting active decay, you need a “scorched earth” policy. The peroxide destroys the bad Pythium fungus instantly on contact, which is the priority. Once the rot is gone and you repot into a chunky mix with worm castings, you are reintroducing all the beneficial microbes back into the system. Don’t worry about the good guys right now; focus on stopping the bad guys from destroying your plant.
Conclusion
Monstera root rot is a scary situation, but for a Monstera deliciosa, it is rarely a final loss if you catch it in time. The plant wants to live. It has nodes designed to reboot its life system. I have saved plants that were nothing more than a wet stick and a single leaf.
The “Water Rehab” method gives you a second chance. It allows you to press the reset button, clear the problem, and watch the plant rebuild itself in a clean, safe environment. It requires bravery to cut away the rot, but the reward is a plant that comes back stronger, with a root system you built yourself. Every expert gardener has lost plants; the difference is that we learn to recognize the signs of monstera root rot early and act fast.
You’ve got this. Happy rescuing!