Quick Answer: The fastest method for how to propagate monstera is to leverage the aerial root advantage. Select a stem node with an attached aerial root, cut just below the node, and submerge it in water. This technique accelerates the growth of secondary roots and prevents rot, making the transition to chunky soil safer and quicker (4-8 weeks).
There is a specific moment of hesitation that every plant parent feels the first time they decide to chop their beloved Monstera deliciosa. I remember standing in my living room, holding a pair of kitchen scissors (a mistake I’ll explain later) and staring at my overgrown plant. It had taken me two years to grow those fenestrated leaves. Was I really about to cut off a healthy stem?
I know this fear intimately. This specific plant has accompanied me through three house moves, surviving dark corners and moving trucks, so the thought of damaging it felt like a betrayal. I remember my first attempt vividly: I hesitated, crushed the stem, and watched it rot. Within a week, the cutting had turned into black, smelly mush. I was devastated. I thought I lacked the “green thumb” gene, but I was just missing the right technique.
Why do most cuttings rot instead of rooting?
In my experience, that fear comes from a lack of understanding. We see the plant as a single, fragile organism. But once I started viewing my monstera not as a pet, but as a biological machine, everything changed. I realized that propagating isn’t damaging the plant; it’s unlocking a backup drive. As I cover in my broader Monstera deliciosa care guide, this plant is biologically engineered to be cloned. It actually wants to expand its territory, and successful propagation is just about respecting its natural anatomy.
Over the years, I have propagated hundreds of cuttings. I’ve rotted them, dried them out, and snapped them by accident. Through all those failures, I developed what I call the “Aerial Root Advantage.” By learning how to propagate monstera correctly, you stop guessing. In this guide, I will walk you through every single sensory detail—the snap of the shears, the texture of the callus, and the exact moment to transfer to soil—so you know exactly what to look for, what to touch, and how to succeed.
Table of Contents
How to Propagate Monstera: Understanding the Plant Anatomy
Why does cutting a leaf never result in a new plant?
Before you even sanitize your shears, you have to identify the biological target. I have seen countless beginners make the same heartbreaking mistake: they snip a beautiful, long stem with a massive leaf, put it in a vase, and wait. And wait. Eventually, the stem turns black, and the leaf yellows. They failed because they tried to propagate a Monstera deliciosa from just a leaf. When you are learning how to propagate monstera properly, you must understand that the leaf stem (the petiole) is a non-viable end.
If you cut the petiole and put it in water, it might develop roots. I have had “Zombie Leaves” live in jars for over a year. They look alive, they drink water, but they are stagnant ghosts. They lack the genetic machinery to produce new growth. They will never push out a new leaf. This is what we call a “Zombie Leaf.” Realizing that a leaf alone isn’t enough is the most common hurdle when figuring out how to propagate monstera for the first time. To create a clone, you need stem tissue. Specifically, you need a “node.”
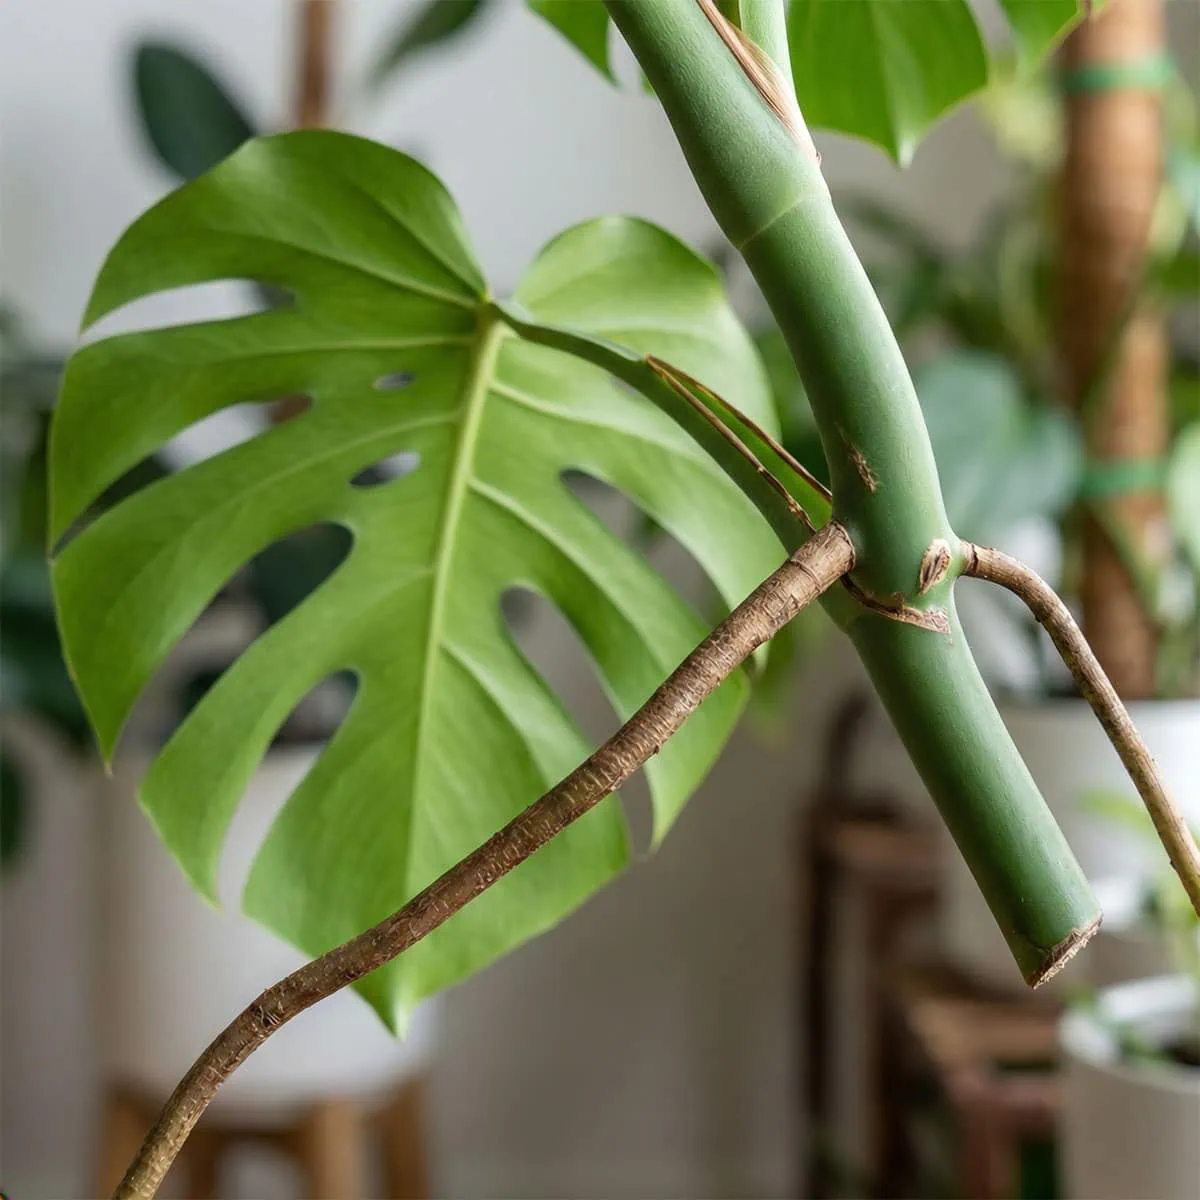
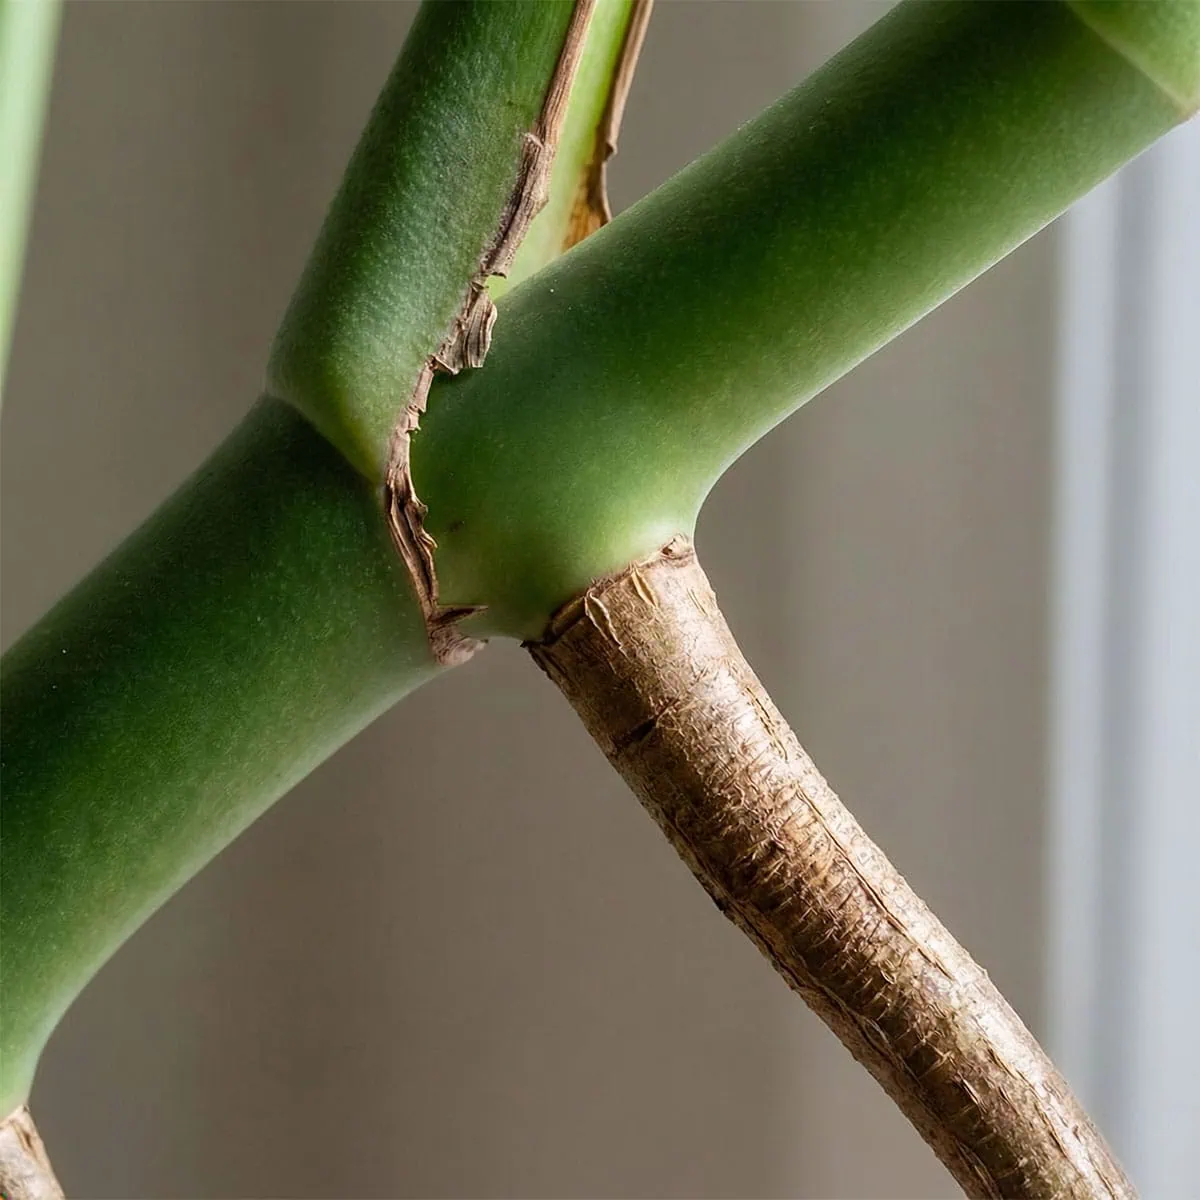
On a monstera vine, the node is that thickened, knuckle-like ring where the petiole connects to the main green vine. It often looks slightly swollen and has a lighter green or brownish line circling the stem. This is the factory floor. This small section of tissue contains the axillary bud—the undifferentiated cells that act like biological 3D printers.
For a deeper scientific breakdown of why these meristematic tissues are non-negotiable for new growth, I recommend reading the guide on plant propagation principles from the University of Minnesota Extension. It confirms exactly why cutting above the node results in failure.
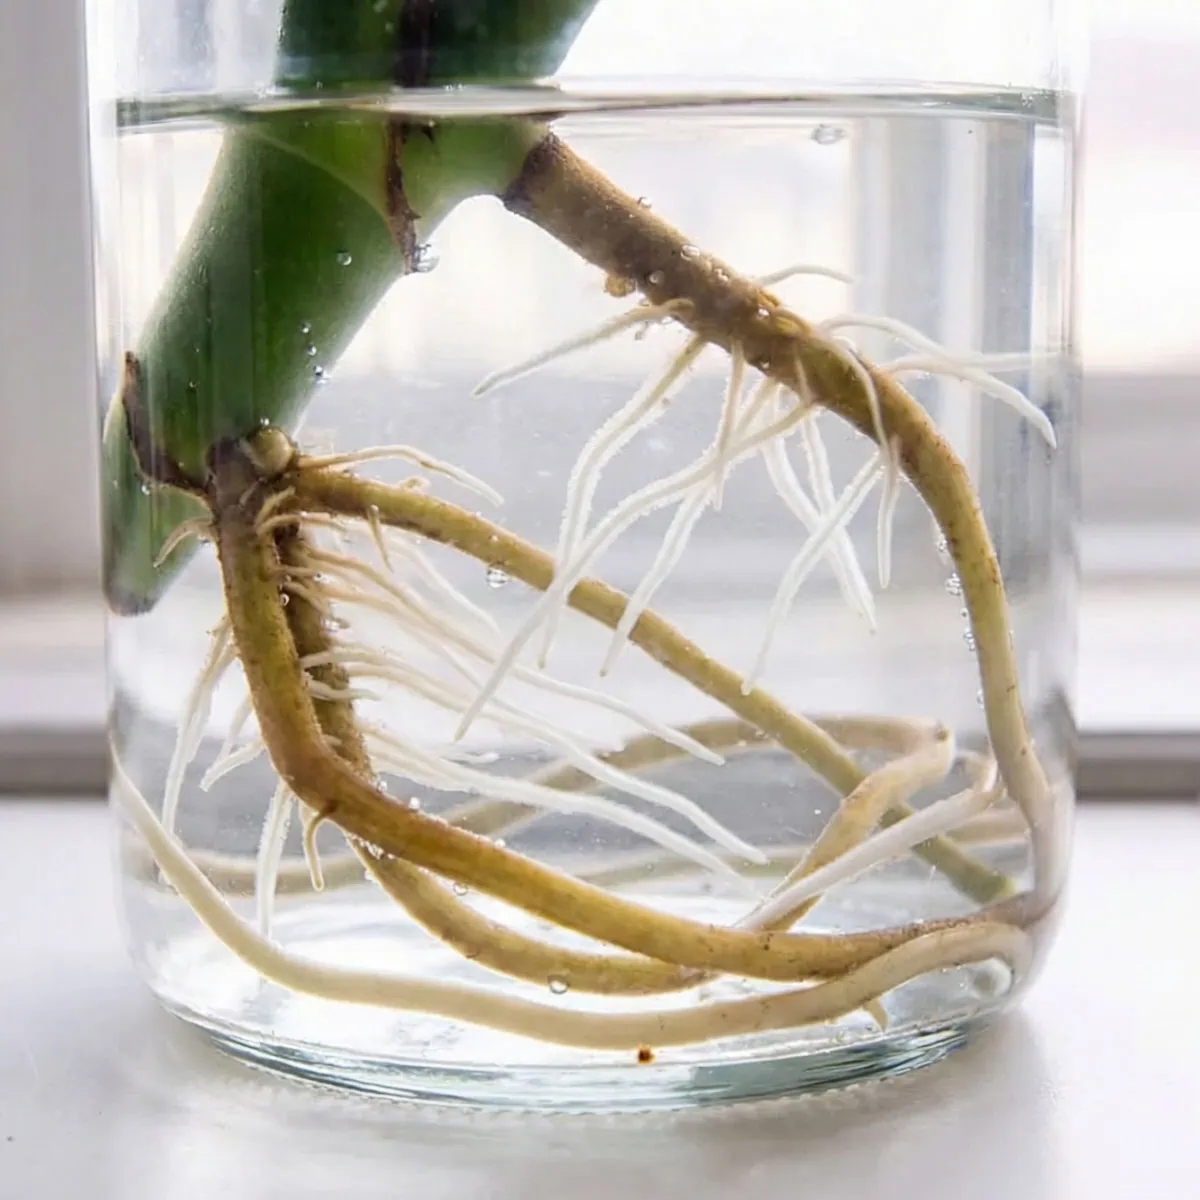
The smooth, tubular space between two nodes is called the “internode.” Think of this as just a structural pipe. It transports water and sugar, but it has no ability to create new life. If your cutting is just a piece of internode, it will rot 100% of the time. When you are mapping out your cut, your goal is to cut through the internode while preserving the node intact. However, in my experience, not all nodes are created equal. We are looking for a “Super Node”—one that already has an aerial root attached to it.
You can feel the difference with your eyes closed. Run your fingers down the stem. The internode feels completely smooth, like a PVC pipe. When your finger hits a bump, a ridge, or a textural change, you have found the node. That bump is the sleeping eye of the plant. If you miss that bump, you are just arranging cut flowers, not propagating a future jungle giant.
The “Aerial Root Advantage” Strategy: Using a Monstera Cutting with Aerial Root
Why start from zero when you can start with a head start?
Most standard propagation tutorials tell you to take a node, stick it in water, and wait for roots to generate from scratch. That works, but it takes significant energy. The plant has to burn its stored sugars to build entirely new root tissue before it can start drinking efficiently. My strategy is different. I use the aerial root as a shortcut.
The aerial root is, biologically speaking, already a root. In the wild, it is adapted for air—it is hard, woody, and covered in a thick protective layer to prevent drying out. While you might normally wonder how to handle wild Monstera aerial roots growing in your living room, here they are the secret ingredient. These roots are adaptable. If you submerge an active one in water, it sheds that hard outer layer. Almost instantly, it begins to transform. The tip softens, turns white, and starts functioning as a water-absorbing root.
By specifically selecting a monstera cutting with aerial root, you are giving your new plant an immediate hydration system. It does not have to live solely off the energy stored in the stem piece while it builds a root system from nothing. It can start drinking water on day one.
I have found that cuttings with at least three inches of aerial root attached tend to push out their first new leaf weeks faster than cuttings without them. It acts like a battery pack. Instead of spending two weeks building the factory, the plant can immediately start production. This simple trick is often the missing link for people struggling with how to propagate monstera successfully in lower light conditions.
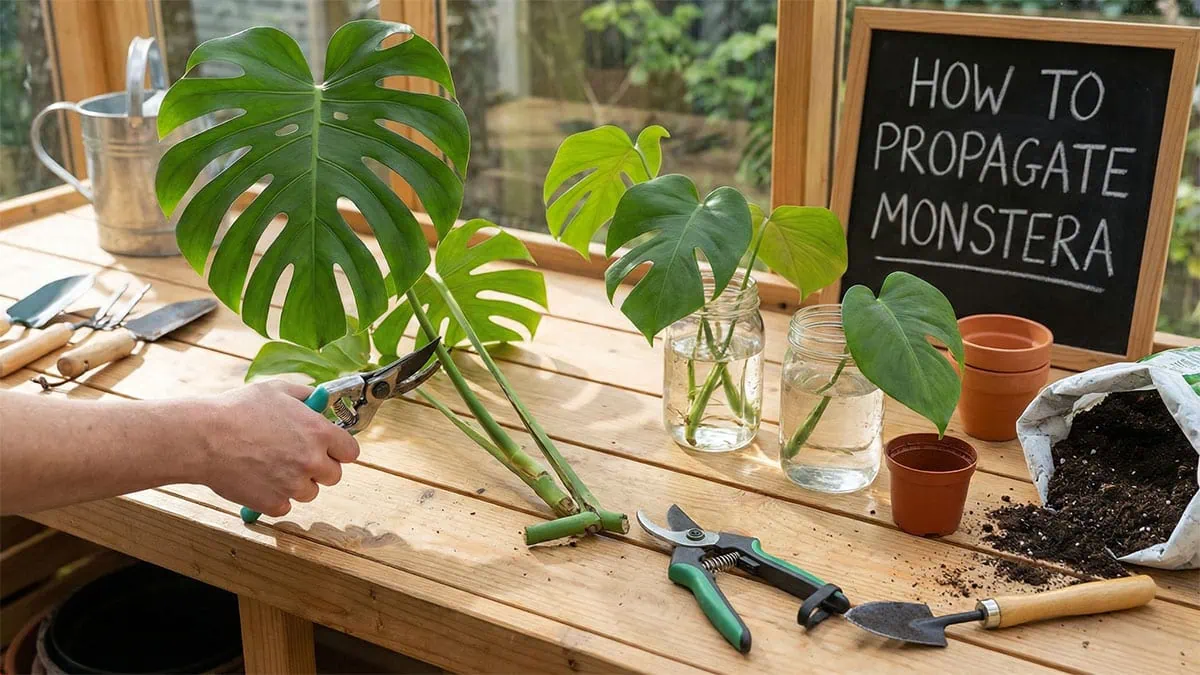
Step 1: The Hunt and The Cut (Identifying Monstera Node vs Aerial Root)
How do you make the ideal precise cut?
Sanitation is critical. I cannot stress this enough. You are about to create a large, open cut on a thick, fleshy stem that is full of sugar. Before I even touch the plant, I wipe my bypass pruners with 70% isopropyl alcohol. I wipe them until the metal feels cold and smells sanitized. Do not use kitchen scissors. Kitchen scissors crush the stem tissue before cutting it, causing bruising that leads to rot.
Now, look at your vine. Find a leaf you want to propagate. Follow the leaf stem (petiole) down until it hits the main vine. Locate the node (the knuckle). Now, look below that node. Is there a brown cord growing out of the vine? That is your aerial root. You want to make your cut about an inch or two below the aerial root.
You need to leave this “buffer zone” of internode below the node. Why? Because when you put a cut stem in water, the bottom quarter-inch often turns black and withers back as it callouses. If you cut right up against the node, that die-back might eat into the node itself, destroying your “factory.” By leaving an inch or two of stem, you give the rot a buffer to chew on without damaging the vital tissue.
Take a deep breath. Position your shears. Make the cut in one clean, smooth motion. You should hear a sharp “snap,” not a crunch. Once the cutting is in your hand, check the cut surface. It should look white and green, crisp and flat. If it looks ragged or stringy, use a sanitized razor blade to clean it up. If you notice any jagged edges, smooth them out gently. A clean surface area seals significantly faster than a rough one because there are fewer micro-crevices for pathogens to hide in.
Step 2: The “Callous” Seal (A Vital Step in Your Monstera Propagation Guide)
Why does your water turn cloudy and smelly so fast?
This is the step most people skip because they are impatient, and it is the number one reason their propagation fails. A monstera stem is thick and juicy. It is essentially a water pipe full of sap. If you plunge that fresh, weeping exposed area immediately into a jar of water, it leaks sugars, starches, and nutrients directly into your propagation vessel.
This sugary water is the ideal breeding ground for germs. Within 24 hours, the water will turn cloudy. Within 48 hours, it will smell like rotting vegetables or old gym socks. This microbial bloom creates a slimy biofilm that coats the stem and suffocates the cutting, preventing it from absorbing oxygen. This is how rot starts.
To prevent this, you must let the cutting “callous.” After I make my cut, I do not put it in water. I lay the cutting on a paper towel on my kitchen counter, away from direct sun. I let it sit there, in the open air, for at least 12 to 24 hours. I check the cut end periodically. Freshly cut, it is wet and shiny, often dripping clear sap.
After 12 hours, the texture changes completely. It should look dry, matte, and slightly white or tan. When you run your finger over it, it should feel like parchment paper, not sticky. This “callous” acts exactly like a scab on your knee. It seals the nutrients inside the stem and locks the pathogens out. Once that seal is formed, your monstera propagation guide protocol becomes much safer.
Step 3: Propagating Monstera in Water (The Vessel)
How do you set up the environment for success?
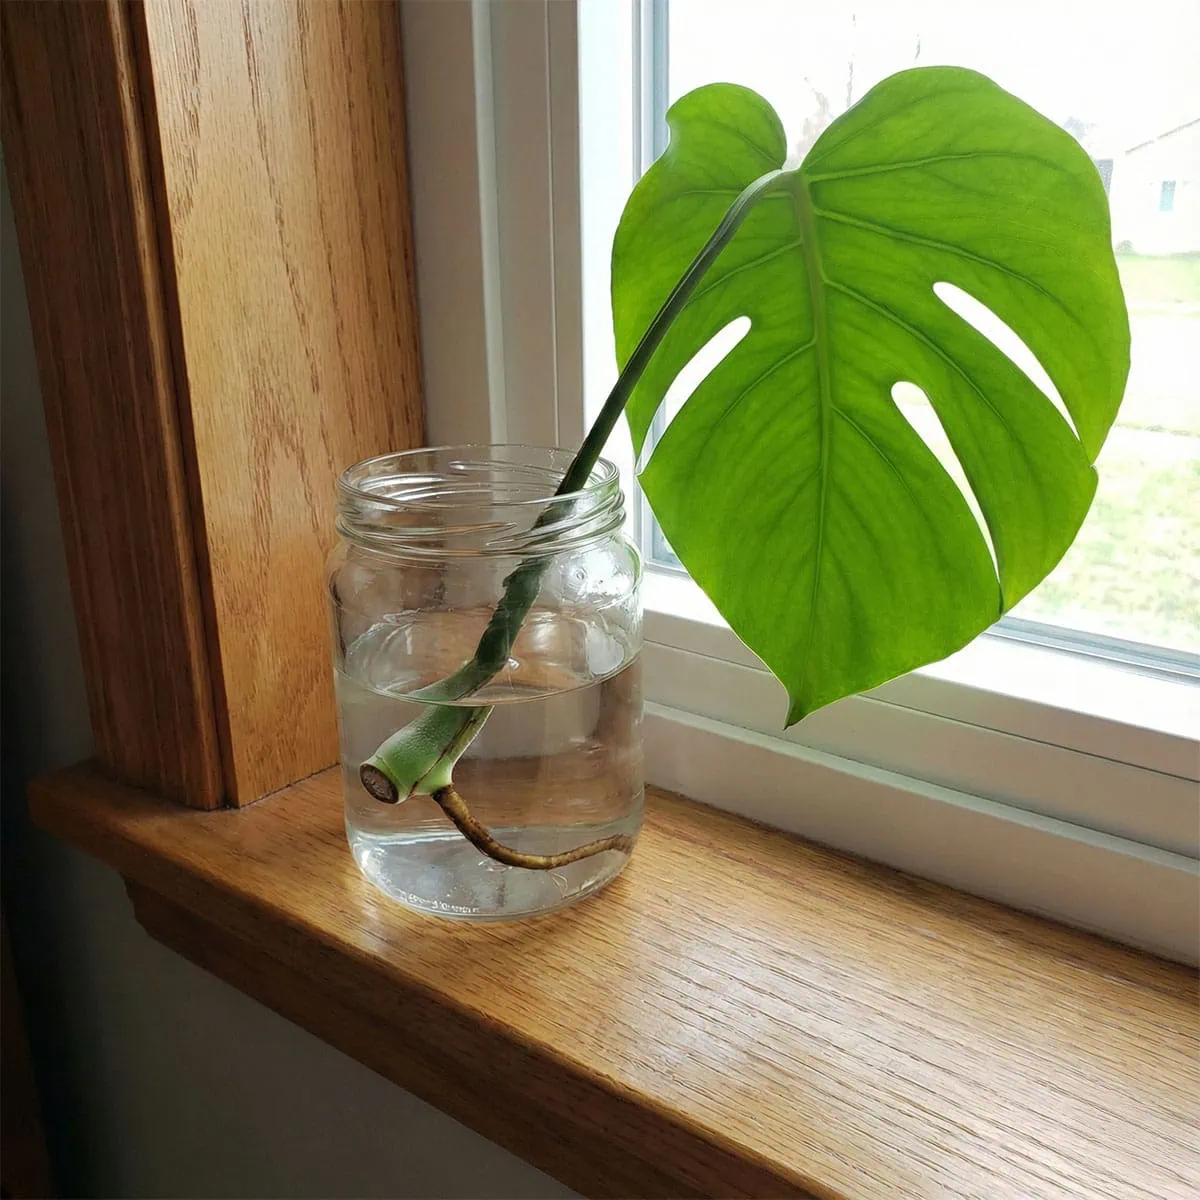
Now it is time to put it in water. But you need the right vessel. Monstera deliciosa leaves are heavy, broad, and incredibly top-heavy. If you put a large cutting in a lightweight cup, it will tip over the moment you walk past it. I use a heavy glass mason jar or a thick-bottomed vase. I always choose clear glass. I need to be able to see the water clarity and the root development without pulling the plant out every day.
Fill the vessel with room-temperature water. Cold water from the tap can shock the tropical tissue, causing it to go dormant. I let my water sit out overnight to degas chlorine and reach ambient temperature. This resting period also ensures the dissolved oxygen in the water stabilizes, creating a milder environment for the sensitive new tissue.
Place the cutting in the water. Here is the golden rule for propagating monstera in water: Only the aerial root and the stem node should be underwater. The leaf petiole must stay dry. I have learned this the hard way. The petiole tissue is not designed to be submerged. If the base of the leaf stem sits in water, it will turn to mush and rot, and that rot will travel down to the node. Adjust the water level carefully so that it covers the knobby node and the aerial root but stops well below where the leaf stems branch off.
Step 4: The “Secondary Root” Rule for Rooting Monstera Cuttings
When is it actually safe to move to soil?
Place the vessel in a spot with bright, indirect light. A north or east-facing window is ideal. Do not put it in direct intense sun; the water will heat up and cook the stem like soup. Now, the waiting game begins. This is the crucial period in how to propagate monstera.
Watch the aerial root. Within a few days to a week, you will see a transformation. The brown, woody skin will crack open, revealing bright white, fuzzy tissue underneath. These are the “water roots” bursting out. It looks a bit like popcorn popping. If you are rooting monstera cuttings without an aerial root, you will see white bumps (primordia) forming on the stem first, which then erupt into roots. This process takes longer, but it works.
The hardest part is knowing when to stop water propagation. Beginners get excited when they see the first white root that is two inches long, and they immediately pot it in soil. This is a mistake. That single, smooth water root is fragile and used to 100% moisture. If you rush to transfer it, even into the best soil for Monstera, that single root will struggle to absorb enough water from the airy, chunky mix to support the massive leaf. The plant will go into transplant shock and droop.
I follow the “Secondary Root” rule religiously. Look at the white roots coming out of the aerial root. Are they long? Good. Now look closer. Are there smaller, hair-like roots growing out of those roots? These are secondary roots. When the root system has branches—roots growing from roots—it creates a complex web with a massive surface area.
This web is robust enough to handle the transition to soil. Waiting for secondary roots usually takes anywhere from 4 to 8 weeks, depending on the temperature, but it ensures a seamless transition. The goal is to build a root ball that looks like a messy mop head, not a single noodle.
Troubleshooting: The “Rescue Mission” Protocol
What should you do when signs of trouble appear?
Even with the best preparation, biology is unpredictable. Sometimes, despite your best efforts, the water turns murky, or the stem starts to discolor. Do not panic. Most issues are reversible if caught early. Part of learning how to propagate monstera is accepting that some cuttings will fight you, but knowing these rescue signs will save 90% of them.
The Water Smells Rotten
If you lean in and smell that distinct, swampy odor, rot have taken over. Dump the water immediately. Rinse the vessel with warm water and soap. Then, take the cutting to the sink. Run it under lukewarm water and use your fingers to gently rub the stem to wash off the slimy biofilm. If the end of the cutting is black and mushy, you are dealing with early Monstera root rot. Sanitize your knife and remove the decayed tissue immediately. Cut until you see clean white tissue again, let it callous for a few hours, then start over with fresh water.
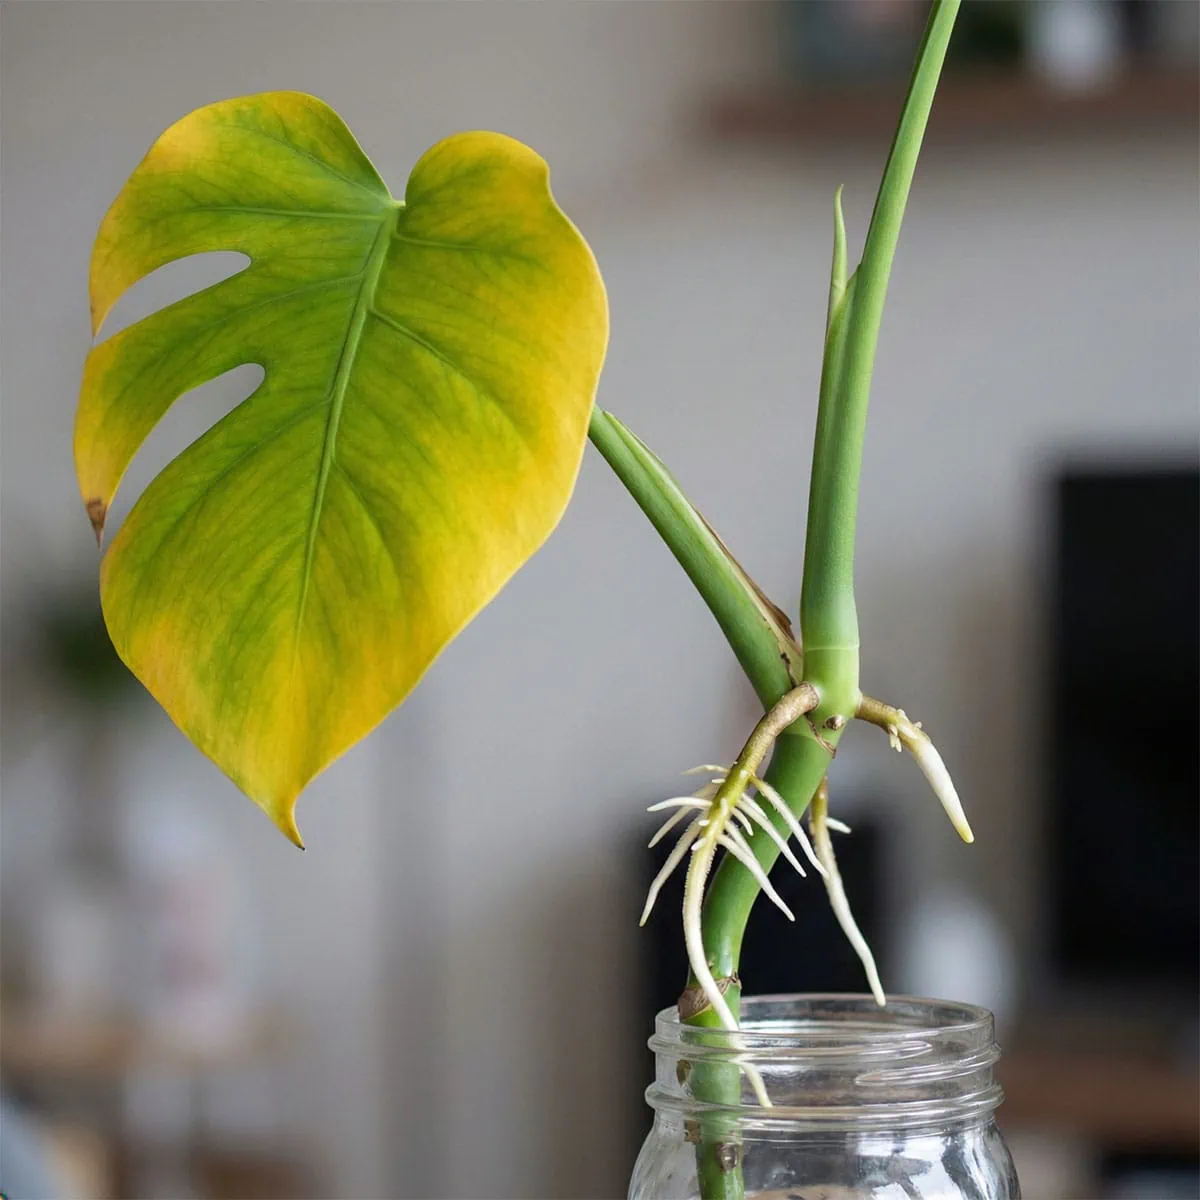
The Roots Are Growing, But the Leaf Is Yellowing
This is often a resource allocation issue. The plant is cannibalizing the old leaf to fuel the root growth. As long as the yellowing is slow and the stem remains firm and green, let it be. The leaf is acting as a battery. Once the roots are established in soil, new growth will emerge.
Frequently Asked Questions (FAQ)
How long does it usually take to learn how to propagate monstera?
In my experience, learning how to propagate monstera is strictly a patience game. You typically see the first white nubs within two weeks if the room is warm. However, a full root system ready for potting takes about two to three months. I once rushed a cutting after four weeks, and it drooped immediately. True success happens only when you wait for those complex secondary roots to branch out fully and support the heavy leaf.
Is propagating monstera in water better than using soil?
I prefer propagating monstera in water because it allows me to monitor the health of the cut end daily. Soil hides rot until the leaf turns yellow, which is often too late. Water gives you a front-row seat to the biology. While moss stays moist, I find that clear glass and fresh water offer the best visibility for beginners who want to avoid guessing games and potential failure during this critical phase.
Can I plant a monstera cutting with aerial root directly into soil?
You can, but I advise against placing a fresh monstera cutting with aerial root straight into soil. Even though the aerial root is tough, it needs to transition into a soil root to absorb moisture effectively without shock. I have found that water propagating this cutting first creates a much stronger feeder root system. This intermediate step drastically reduces the chance of the stem rotting unseen underground before it ever establishes.
Do my fresh cuttings need direct sunlight to grow roots?
No, direct sun is actually dangerous for fresh cuttings. I learned this the hard way when I cooked a beautiful leaf on a windowsill. The water heats up and encourages microbial bloom. Instead, place your vessel in bright, indirect light. Think of it as a gentle glow rather than a spotlight. Low light will make the process agonizingly slow, but harsh sun will scorch the delicate tissue before it even has a chance to develop roots.
Should I add liquid fertilizer to the water jar?
I never add fertilizer to the water during the initial rooting phase. The plant has enough stored energy in the stem segment to push out the first roots naturally. Adding chemicals now can burn the delicate new tissue and encourage algae growth in the vessel. I only start feeding my new plant about a month after it has been transferred to its permanent chunky soil mix and shows obvious signs of new growth.
Conclusion
Is the wait really worth it for a single new plant?
Knowing how to propagate monstera in water is a lesson in biology happening right on your countertop. It turns the mysterious underground process of rooting into a visible spectacle. I still get a thrill every time I see that first white nub break through the dark skin of an aerial root.
By utilizing the aerial roots and respecting the anatomy of the node, you are working with the plant’s natural desire to expand. You are taking a feature that many people find ugly (the brown woody root) and turning it into the engine of new life. Have patience, keep the water clean, wait for those secondary roots, and remember that sanitation is your best friend. Trust the factory floor, and you will have a jungle in no time.
You’ve got this. Happy propagating!