⏱️ 30-Second Answer: keeping a moth orchid alive and in bloom
Phalaenopsis orchid care demands bark watered only when nearly dry, about every 7–10 days — Phalaenopsis is an epiphytic Orchidaceae moth orchid. Its roots breathe air between soakings, so a constantly wet, airless pot is the number-one killer indoors.
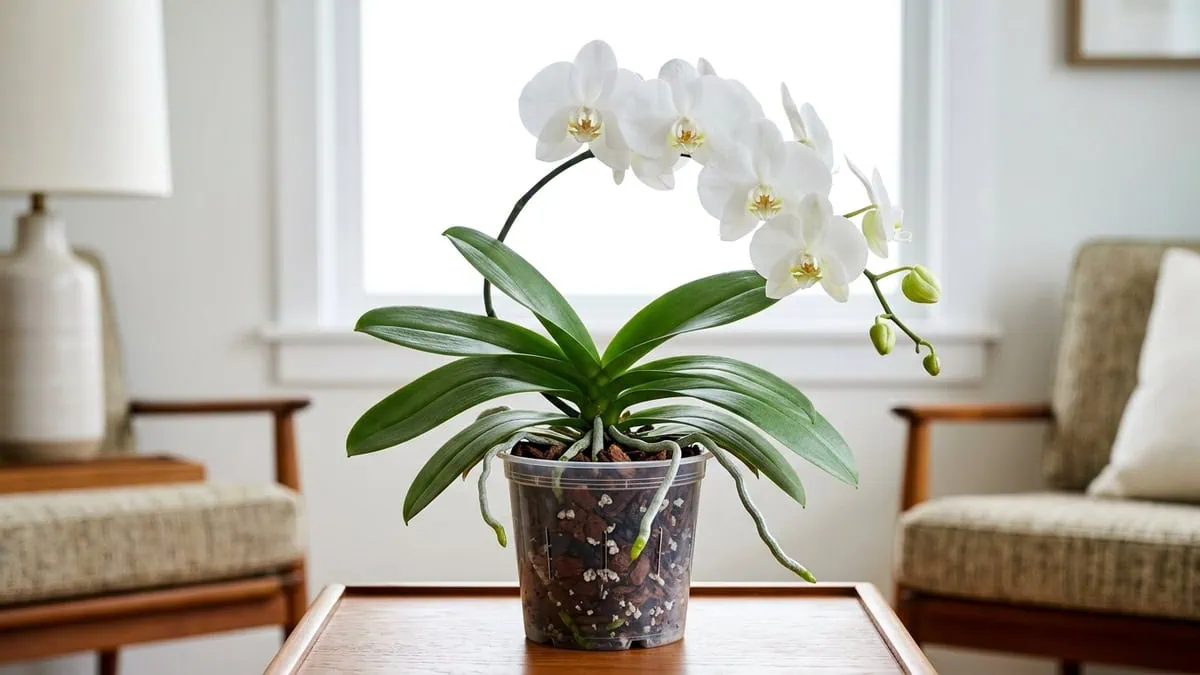
Read the silver-and-green roots through a clear pot before you reach for the watering can. Park the plant in 1,000–1,500 foot-candles of bright, indirect light, or it lives but never reblooms.
Hold daytime warmth near 70–80°F and humidity at 50–60%. One stretch of cool nights in the high 50s°F triggers the next flower spike.
- Before watering: check root color through the clear pot — silver means thirsty
- Soak, then drain: flood the bark, let every drop run out
- Never: ice cubes, garden soil, or a pot sitting in water
- To rebloom: brighter light plus a run of cool nights, not more food
- Relax: moth orchids are non-toxic to cats, dogs, and horses
The first warning is almost never in the roots — it is one bottom leaf going soft and yellow while five fat buds nod above it, and that contradiction fooled me for three years. I lost five moth orchids — watering by a tidy weekly schedule, not the plant: bark that never dried, velamen roots gone to brown mush, a crown that toppled at a touch.
Honestly? My calendar was the fragile thing, not the orchid. Hmm, on reflection, counting days was the wrong instrument — I assumed a moth orchid sips like any leafy houseplant, until those rotted roots taught me a Phalaenopsis keeps no water-storing pseudobulb, runs on thrifty night-time CAM photosynthesis, and wraps each root in spongy velamen built to drink in seconds, then breathe bone-dry for days (yeah, learned this the hard way).
The fix is almost embarrassingly simple — stop counting days, start reading the roots and the bark. Those targets fit on one cheat sheet.
Take a breath — if your moth orchid looks halfway gone right now, the following table holds the handful of targets that pull it back from the brink.
Phalaenopsis orchid care at a glance: the numbers that matter
| Moth orchid specs | Recommended care |
|---|---|
| Light (sweet spot) | 1,000–1,500 FC bright, indirect; leaf scorch above ~1,500 FC |
| Watering trigger | Soak when nearly dry; ~weekly in bark, ~10 days if cool |
| Substrate & pH | Coarse fir bark, charcoal, perlite; never soil; pH 5.5–6.5 |
| Container | Clear vented plastic, bottom drainage; not terracotta indoors |
| Humidity & temperature | 40% floor, 50–60% target; days 70–80°F, nights 60–70°F |
| Fertilizer | Balanced 20-20-20 (30-10-10 in bark), weak ¼–½ strength |
| Is it pet safe? | Yes — non-toxic to cats, dogs, and horses (ASPCA) |
| Is it frost tolerant? | No — cold damage starts around a 50°F floor |
Table of Contents
Why a soggy root zone is the number-one killer — and the soak-then-dry fix
A constantly wet root zone — not too little water, not too little light — is what kills the most moth orchids indoors.
Comb through the houseplant forums and roughly seven of every ten failed Phalaenopsis trace back to the same culprit: bark that never dries, roots starved of air, and rot that races through the pot before a single leaf looks wrong.
That is why watering, not light, leads this guide. The American Orchid Society’s own guidance on orchid root health and watering starts from the same place: match every soak to the state of the roots, not the calendar.
The reason is pure anatomy. A moth orchid grows as an epiphyte — in the wild it clings to tree bark, never to soil — so its thick roots are built to grab a downpour fast and then dry out in open air, which is the opposite of what a soggy pot allows.
Bury those roots in bark that stays wet and the living tissue suffocates, browns, and goes soft. Overwatering forces root rot, and a moth orchid keeps no water-storing pseudobulb to ride it out. The damage hides until it is severe.
Velamen: the spongy, silver-white layer that sheathes each orchid root. It soaks up water within seconds, then has to dry and breathe — which is exactly why permanently wet bark drowns it.
So the goal is not to water more or less on principle. It is to time every soak to the roots themselves, then get out of the way.
Watch them closely and the whole guessing game falls apart, because the plant stops being a mystery and starts being a gauge you can read at a glance. If your roots have already gone dark and slimy, the deeper rescue lives in my walkthrough on rescuing a plant with rotted roots.
The next two sections make that practical — first how to read those roots through the pot, then how to soak and drain so they never sit wet.
How to read the roots through a clear pot before you water
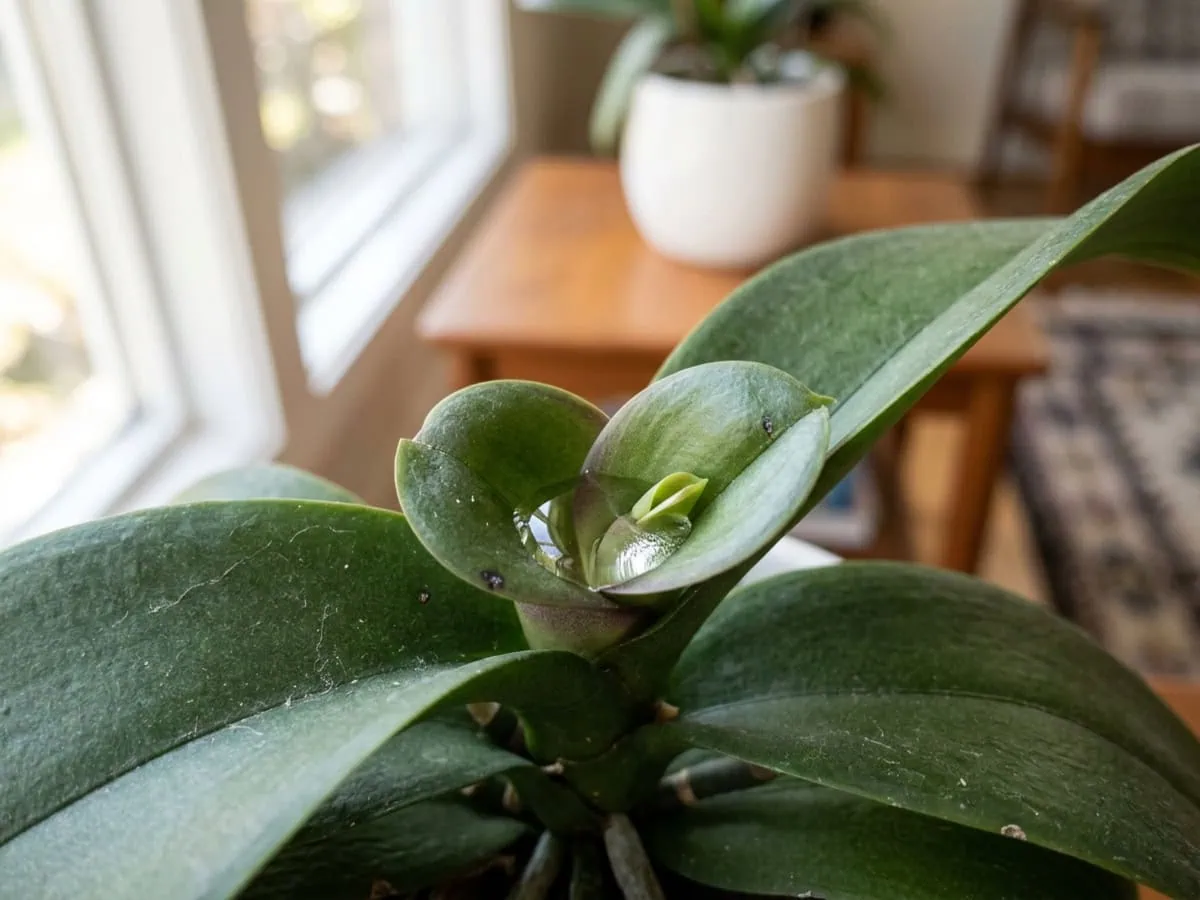
Read the roots, not the leaves — that one habit spares more moth orchids than any other. A clear nursery pot turns the root mass into a live moisture gauge you can check in two seconds without disturbing a thing.
A living root reads firm and white-to-silver with a bright green growing tip, while a dying one turns brown, hollow, and slimy.
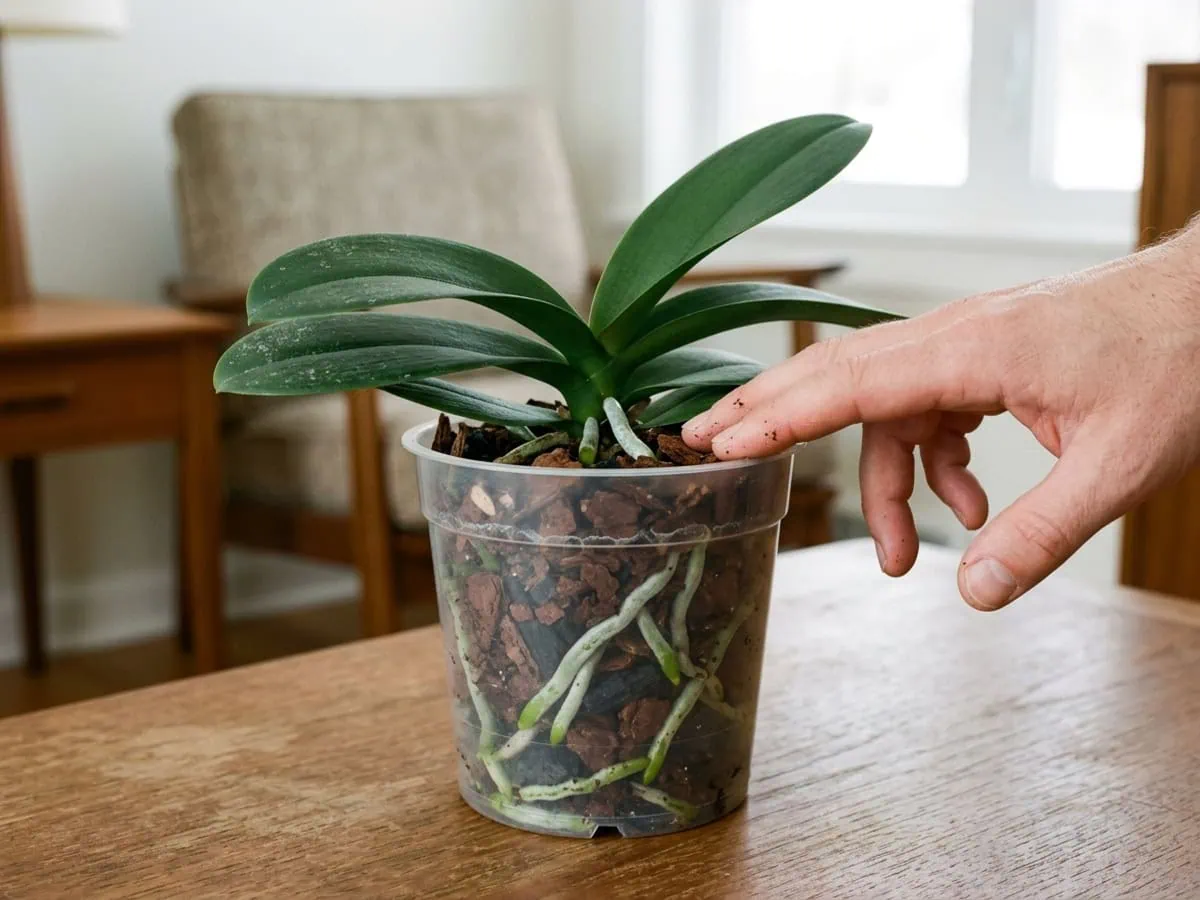
Watch the color, and the watering question answers itself. Right after a soak the roots flush a vivid green; as the bark dries over the next few days they fade to a chalky, matte silver. That silver is your signal.
For a second opinion, press a fingertip into the bark near the pot wall — if it comes away cool and damp, wait another day or two; if it feels dry and the chips rattle loose, soak.
Soak, drain fully, then wait for near-dry
Soak the bark until water streams from every drainage hole, then tip the pot and let all of it run out. A quick, thorough flood beats a daily dribble every time: the velamen drinks what it needs in those few minutes, and whatever lingers in the pot is just standing water waiting to rot the crown.
Never let the pot sit in a saucer or a decorative cachepot of trapped water.
Then wait. Let the bark approach dry before the next soak — approach, not reach, since those fleshy leaves hold the plant’s only real water reserve and should never shrivel.
In a warm, bright room that cycle usually lands somewhere around seven to ten days apart, stretching longer when the light is low and the air is cool. Lock that rhythm in and you have already solved the failure that kills most of these plants; the fine print on technique lives in getting the watering rhythm right.
Quick story: the orchid I nearly lost looked parched — limp, folded leaves — so I watered it harder, which is the exact wrong instinct. When I finally tipped it out, the bark squelched like a wrung-out sponge and the roots crumbled to brown threads between my fingers. The leaves had gone limp because the roots were already dead, not dry. Now I unpot any sulking plant on day one and read the roots before I add a single drop.
How much light it takes to actually rebloom, in foot-candles
Bright, indirect light in the 1,000–1,500 foot-candle range is what separates a moth orchid that merely survives from one that actually reblooms. Survival is the easy part.
Drop below roughly 1,000 FC and the plant hangs on by living off its existing leaves while quietly skipping its flower cycle — that one gap explains the vast majority of healthy-looking orchids that never spike again.
Here is where the label misleads. Phalaenopsis gets filed as a “low-light orchid,” but that ranking is only relative to blazing sun-lovers like Vanda, and it is no license to park the plant on a dark shelf. In plain houseplant terms it wants a genuinely bright window.
Per a peer-reviewed Phalaenopsis photosynthesis study, the photosynthetic light response of Phalaenopsis peaks at moderate light and then slides into photo-bleaching well above the indoor sweet spot, so brighter is not automatically better.
When light runs too low the plant does not collapse — it stalls. New leaves push out thin, floppy, and a dark blackish-green as the plant floods itself with chlorophyll to scavenge what little it gets, and the flower spikes simply never come, no matter how faithfully you chase the cool nights.
That stall is the silent reason so many “easy” orchids sit handsome and leafy for years without a single bloom. The two sections below pin the rest down — first the exact foot-candle range to aim for, then how to match it to a real window.
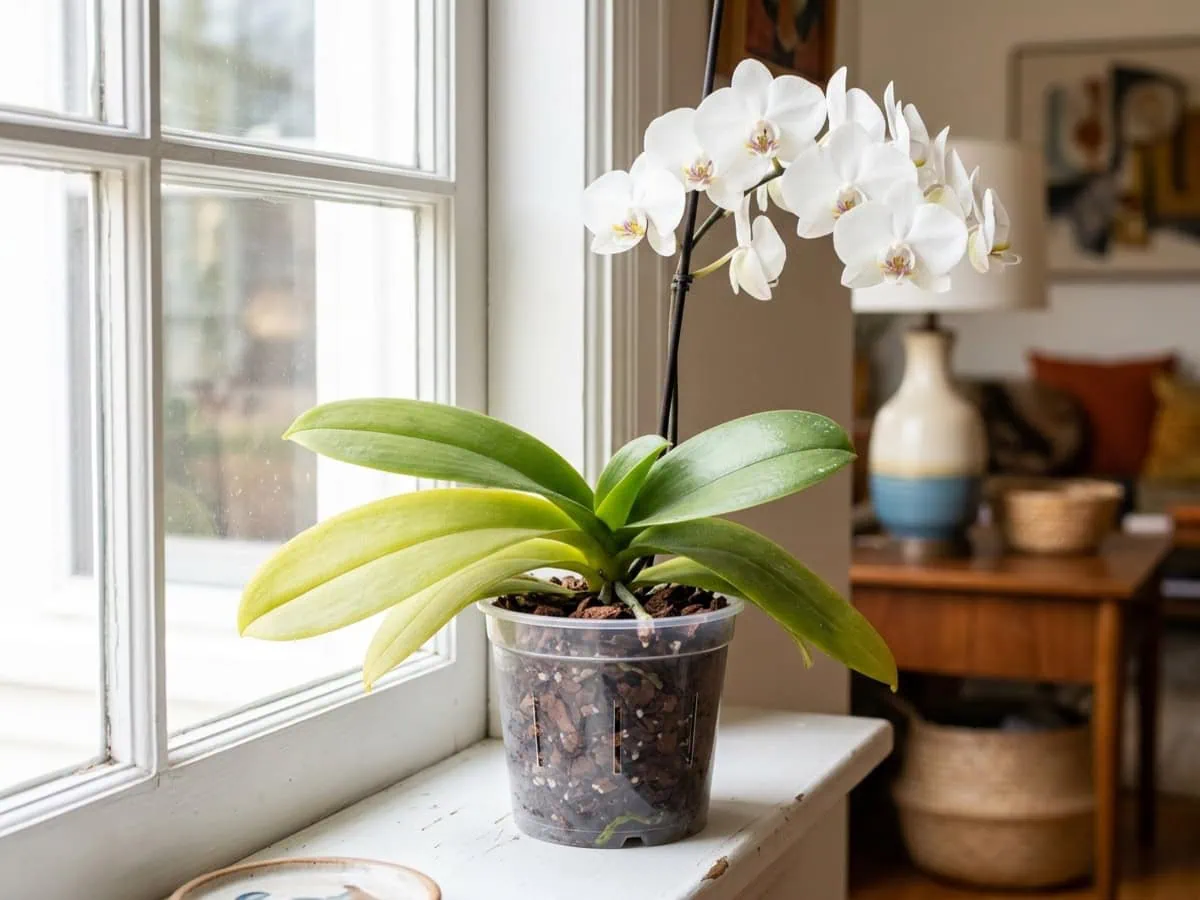
The 1,000–1,500 foot-candle sweet spot
Aim the leaf canopy at 1,000–1,500 FC (roughly 10,000–16,000 lux) and hold it there. The margin is slim. Push past about 1,500 FC of direct sun and the leaves scorch — first a reddish flush along the margins, then bleached, papery tan patches that never green up again.
The good news is that the plant grades its own light for you: foliage held a fresh light yellow-green means the level is right, a deep grass-green means too little, and a red-bronze cast means too much.
No light meter? Hold your hand about a foot above the leaves in the middle of the day. A soft, fuzzy-edged shadow means the light sits in the moth orchid’s sweet spot; a hard, crisp shadow means it is too intense; no shadow at all means the spot is too dim to ever push a spike.
Matching a window to the light a spike needs
An east-facing window (Northern Hemisphere reference) is the easy win — strong morning light without the afternoon heat that bakes south and west glass into a scorch risk. Morning sun is gentlest. A south or west sill works just as well, provided a sheer curtain or a couple of feet of setback knocks the midday glare back down into range.
A north window rarely clears the bloom threshold on its own; the plant stays green and alive but stubbornly spike-shy, so add a full-spectrum LED grow light on a twelve-to-fourteen-hour timer if that is your only exposure. Ensure all electrical equipment is used according to the manufacturer’s instructions and applicable safety standards.
Nail the light and you have set the stage for coaxing a second bloom spike — the cool-night trigger that finishes the job is the next piece of the puzzle.
Indoor humidity and the night-temperature drop that starts a spike
If you have wondered what humidity level do Phalaenopsis orchids need indoors, the answer is a comfortable 40 to 60 percent, with the 50-to-60 band as the sweet spot — plus a short run of cool nights to flip them from leaf-making into bloom-making.
Those two levers, humidity and the night-temperature drop, are exactly what most stuck owners overlook once watering and light are sorted.
Here is the catch that blindsides people. A room that feels perfectly pleasant to you is often sitting at just 20 to 30 percent humidity, especially with the heat running, which is well under the floor this plant needs.
I have a hunch about this but no peer-reviewed source — the precise humidity sweet spot for indoor root growth is still argued over in orchid circles — yet across years of watching plants respond, the 50-to-60 band is where leaves stay firm and flower sheaths stop drying to paper, so a basic hygrometer is the one tool to keep on hand.
Holding 40–60% humidity in a dry indoor room
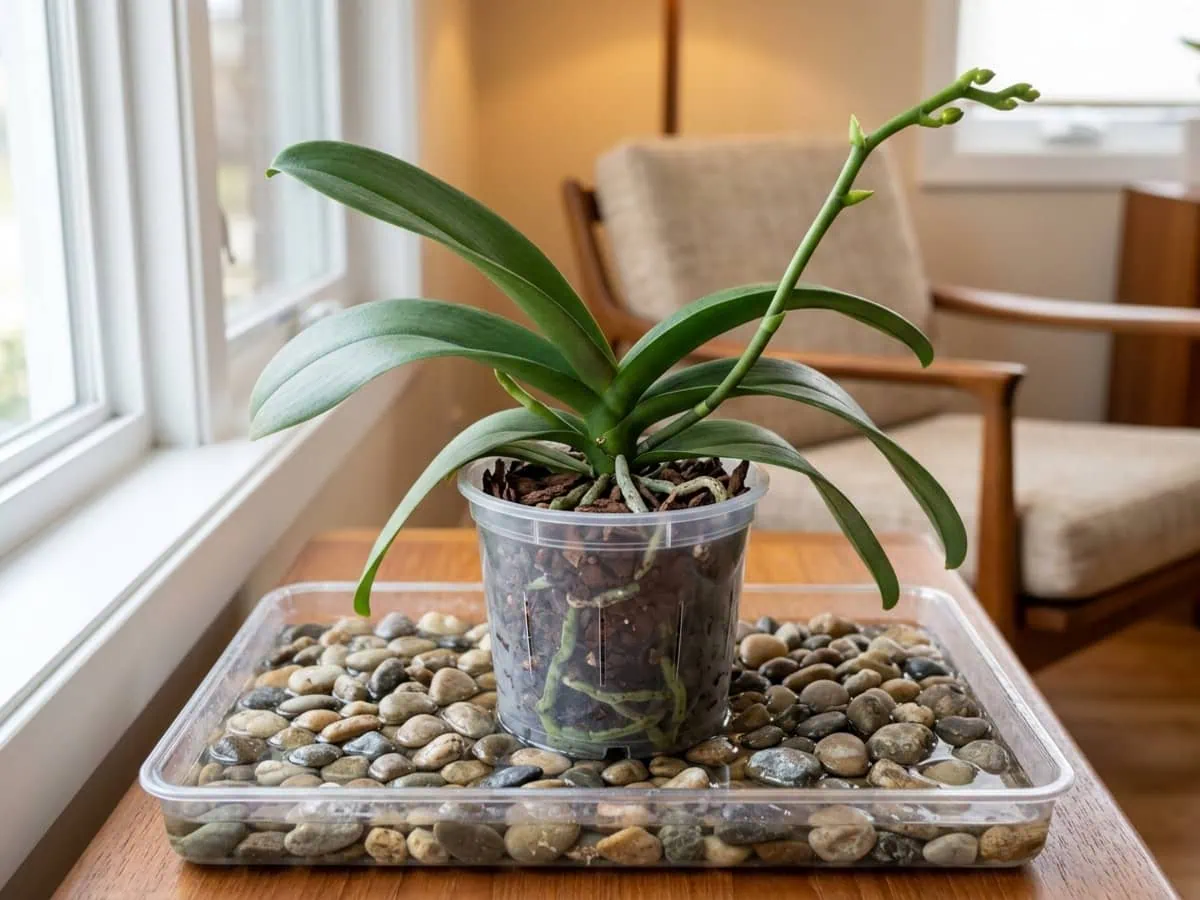
Lifting the moisture around a moth orchid takes no special gear. Set the pot on a wide tray of damp pebbles, with the waterline kept just below the stones so the pot base never touches it, and steady evaporation pads out the air right where the roots breathe.
Group a few plants together and their shared transpiration does the same job across a wider patch.
A hot shower with the bathroom door propped open is a free, whole-room boost on the driest days. Misting, though? Skip it as a humidity strategy — the bump fades in roughly twenty minutes once the droplets dry — even if a quick morning mist of the aerial roots does no harm.
The hygrometer is the honest scorekeeper here: trust the number on the dial, not how the air feels on your skin.
The cool-night drop that triggers a spike
Temperature is the on-switch for flowering. Hold the plant at 70 to 80°F by day and let nights fall to 60 to 70°F, and that everyday ten-degree swing keeps it cruising along in good health.
To actually trip a spike, give a firmer nudge — a stretch of nights down around 55 to 60°F for two to three weeks, while days stay above 70°F. Your programmable thermostat’s nighttime setback quietly does most of this for free.
One catch is worth burning into memory: the moment a spike appears, ease the nights back up to 60 to 70°F, because buds drop fast below 60°F.
A cold draft off a leaky window or an air-conditioning vent is the single most common reason buds yellow and drop, so keep the plant clear of moving cold air and water only with tepid, room-temperature water — never ice cubes, which shock the roots outright.
If buds are already letting go, the targeted fixes live in my guide to stopping premature bud drop.
- Weeks 1–3: cool nights near 55–60°F set the trigger — nothing shows yet
- A few weeks on: a green spike pushes from a lower leaf axil, not a stray root
- 2–3 months later: buds swell and open in sequence from the base upward
- 2–4 months of bloom: flowers hold, then fade; cut it back and the cycle can restart
Bark mix or regular soil? The pot and medium that keep roots breathing
A moth orchid lives in chunky orchid bark, never in regular potting soil — and the pot around that bark matters almost as much. Get this pair wrong and you have rebuilt the same soggy, airless trap from the very first section, which is exactly why so many supermarket plants quietly fail within months of coming home packed in dense moss.
The reason loops back to those air-breathing roots. They need fat pockets of oxygen around them between waterings, and the medium either hands them that or chokes it off. The following table lays the choice out plainly.
| Potting medium | What it does to moth orchid roots |
|---|---|
| Coarse fir bark, charcoal, perlite | Big air gaps and fast drainage; roots breathe between soakings |
| Sphagnum moss (store default) | Holds water heavily; fine short term, risky for months |
| Regular potting soil or peat | Packs tight, stays wet, starves roots of air; reliably rots them |
The verdict is not close: coarse bark in a draining pot wins for nearly every indoor grower, while ordinary soil is the single fastest way to rot a moth orchid from the roots up. The two sections that follow cover both halves of that pairing: the right pot first, then the bark blend that goes inside it.
Why a clear vented plastic pot beats terracotta indoors
Reach for a clear, vented plastic pot first. Plastic holds moisture at a rate that matches the low-evaporation reality of a heated, air-conditioned home, and the see-through wall lets you read root color and moisture at a glance — the same live gauge from the watering section. Those green roots even photosynthesize through the clear wall.
Terracotta is the classic “breathes better” pick, and it genuinely does, yet indoors that breathing usually runs too far: the porous clay wicks the bark dry between soakings and quietly stresses roots that carry no water reserve to coast on.
If your room has low airflow and steady heating or cooling — most homes do — then choose the clear vented plastic pot, because terracotta would dry the bark so fast the roots desiccate. However, if you grow in a humid sunroom, or the plant has grown top-heavy and keeps tipping over, then a terracotta pot earns its keep for the extra ballast and root airflow.
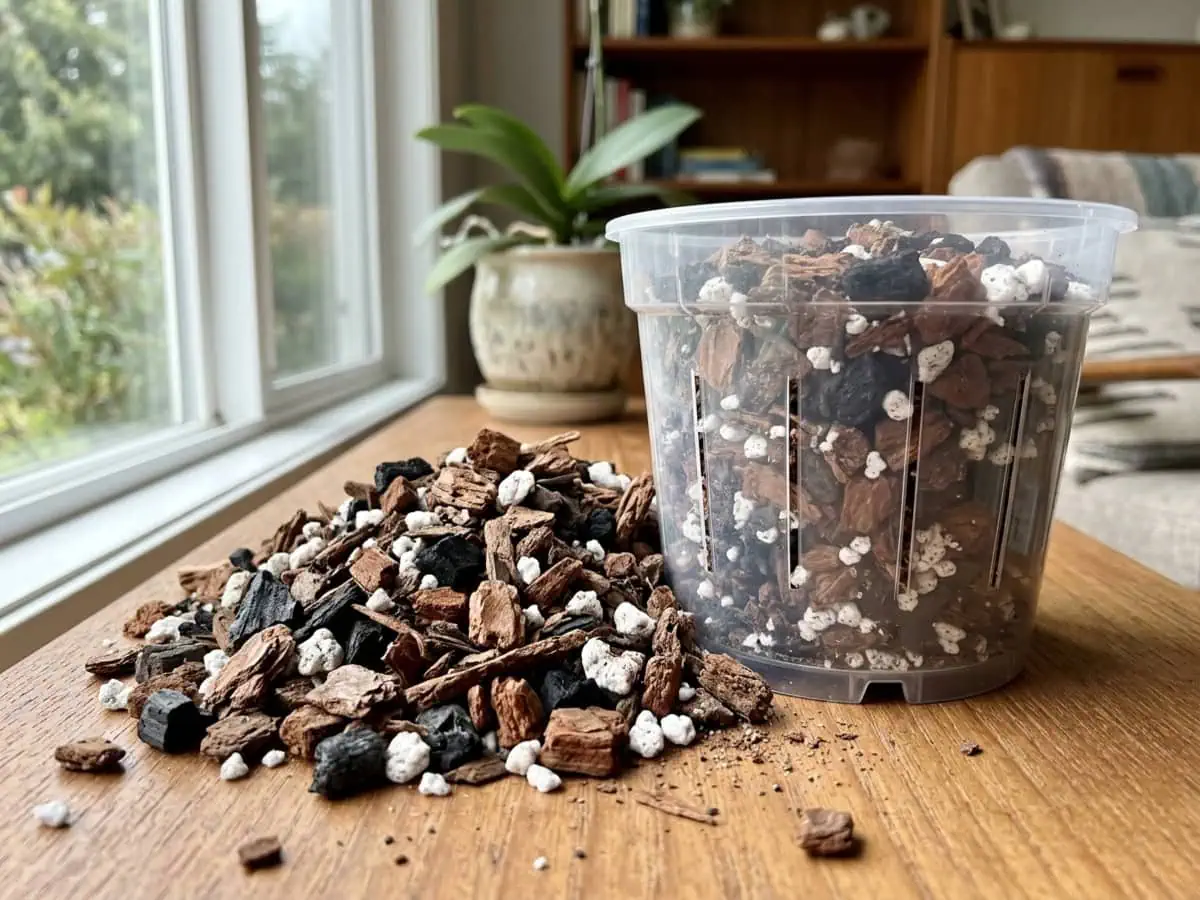
A coarse bark-and-charcoal recipe, never soil
A dependable indoor mix runs five parts medium-grade fir bark (quarter- to half-inch chunks) to one part horticultural charcoal to one part perlite — the same blend Missouri Botanical Garden uses on its own plants.
The bark builds the open structure, the charcoal mops up leftover fertilizer salts and slows decay, and the perlite keeps the whole thing draining freely. Leave out standard potting soil, peat, and landscape mulch entirely; every one of them packs down and presses water against the roots.
Bark is not forever, though. Over roughly two years it crumbles to a dense, soil-like humus that smothers the very roots it once cradled, so plan on a fresh-bark repot on that cycle — and never while the plant is in bloom, or it will drop its flowers. The full hands-on sequence lives in my guide to repotting into fresh bark.
Feeding on a weak, frequent schedule to skip the salt burn
Feed a moth orchid weakly and often — a balanced orchid fertilizer at a quarter to half the label strength, always laid onto already-damp roots rather than dry ones, because food hitting bone-dry roots scorches them. The whole knack is restraint.
This is a slow, lean plant that evolved clinging to bark in nutrient-poor treetops, so it asks for far less than a leafy houseplant and answers excess with burned tips.
Reach for a balanced 20-20-20 in most mixes, or step up to a higher-nitrogen 30-10-10 if you grow in fir bark, since the decomposing bark itself locks up nitrogen as it breaks down.
Pick a formula whose nitrogen is mostly nitrate rather than urea, too — the bacteria that unlock urea barely exist in a clean bark pot. And forget the old “bloom booster” folklore: controlled research on moth orchids found that piling on phosphorus did nothing for flowering, because phosphorus is rarely the limiting nutrient indoors.
The real hazard is salt. Every feeding leaves a little fertilizer salt behind in the closed pot, and once it builds up the tips of leaves and roots burn — classic overfeeding shows as blackened leaf tips from potassium excess, or plain browned tips from general buildup.
A moth orchid hoards potassium because it evolved where that mineral runs scarce, so a heavy hand backfires fast and shows up first on new growth.
A few habits keep that salt in check:
- Drain every soak: let roughly a fifth to a third of each watering run straight out the bottom, so the through-flow carries dissolved salt away before it stacks up.
- Flush monthly: pour plain, fertilizer-free water through the bark every two to four weeks — hard tap water makes it matter all the more, since it arrives already loaded with minerals (water under about 175 ppm of dissolved solids is the gentle ideal).
- Skip the softener: a sodium-based water softener never belongs near the pot.
Once a flower spike is well underway or the first bloom opens, you can simply stop feeding: the plant already holds the reserves it needs to finish the display, and pausing food does nothing to shorten or shrink the flowers.
Through any low-light, short-day stretch when growth crawls, ease off as well — heavy nitrogen in that pre-spike window can even nudge the next flower spike back by a week or more, and food the plant cannot spend just turns to salt.
One pairing is worth a glance past the headline numbers. Calcium and magnesium work in balance, and because hard tap water already runs heavy on calcium, magnesium is the one that tends to fall short indoors — surfacing as a blotchy, watercolor-like mottling on the older leaves that is easily mistaken for a virus.
A balanced orchid feed that includes trace minerals settles it, and keeping potassium modest is the same restraint that holds off the salt burn.
Think of it as feeding the plant’s appetite, not the calendar. A hungry orchid in active growth happily takes a light, regular drink of food, while a resting one wants almost none. If a recent feed has already left scorched, salt-crusted tips, the full recovery steps live in my guide to feeding without salt burn.
Moth orchid biology that explains every care rule above
Moth orchid care clicks into place the moment you see the plant for what it really is: a treetop epiphyte, not a potted flower. The sections below trace each care rule back to that one fact.
Epiphyte roots, velamen, and obligate CAM in plain terms
In the wild a moth orchid clings to bark high in humid forests, its roots bare to the open air, and that lifestyle rewired almost everything about how it drinks and breathes. It runs on CAM photosynthesis, opening its leaf pores by night instead of by day — the reverse of most houseplants — to give up as little water as possible.
My working theory is that this nocturnal thrift, more than any other trait, is why a moth orchid forgives the odd missed soak yet never a permanently wet pot (FYI — those pores are called stomata, and on a Phalaenopsis they stay shut tight all day). Its clock runs backwards.
It grows monopodially, too: one fresh leaf a year from a single upward tip while the oldest bottom leaf slowly yellows and drops, which is ordinary aging, not a cause for alarm.
- CAM photosynthesis: a water-thrifty system in which the leaf takes in carbon dioxide by night rather than by day.
- Monopodial: growth from one upward tip — new leaves on top, the oldest shed from below.
- Pseudobulb: the swollen water-storage stem many orchids carry, which a Phalaenopsis notably does without.
Where it grows wild: range, elevation, and canopy level
These are understory-to-mid-canopy epiphytes of the warm, wet tropics, and the hybrids on store shelves descend from lowland forests across South and Southeast Asia, where it stays warm and humid the year around with no real dry or cold season.
No winter to wait out. No drought to ride. That single detail carries real weight: standard moth orchids never evolved a winter rest, so the old advice to force a cool, dry dormancy is simply wrong for the plant on your sill and can set it back hard.
Everything it wants indoors is an echo of that steady, humid, dappled treetop.
Aerial roots out of the pot: don’t bury or cut
If you are unsure what to do with Phalaenopsis aerial roots growing out of pot, the answer is refreshingly simple: leave them be. Those thick, pale roots wandering over the rim and into the air are not a flaw to correct — they are the plant doing precisely what an epiphyte does.
They are velamen-wrapped moisture sponges, not the gripping climbing roots of a Monstera, so a moth orchid needs no moss pole or stake to hold itself up.
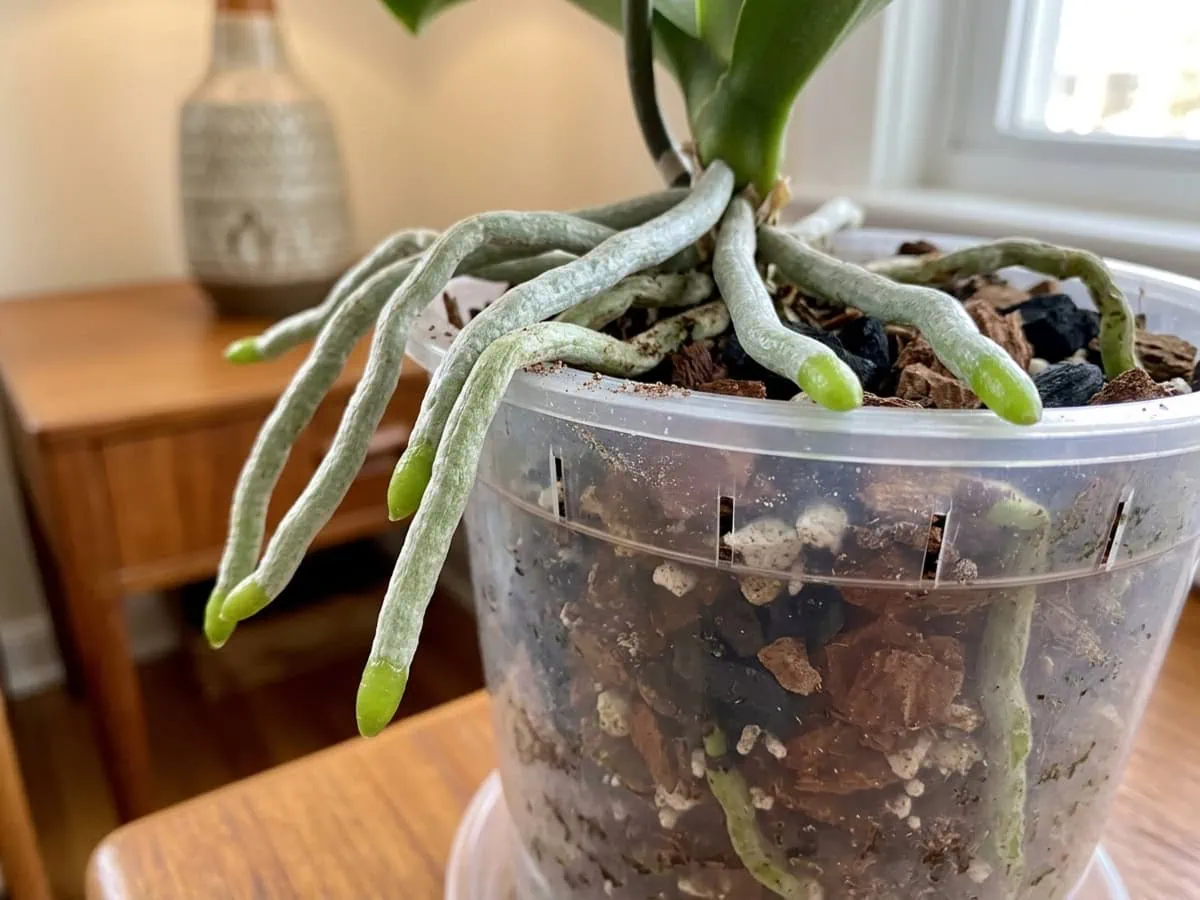
At repotting time, work gently around the healthy aerial roots; never force them down into the bark, and never snip firm silver-green ones off, because each is a living, working organ and every cut is an open door for rot.
A plant still sulking weeks after a repot is usually just in shock rather than failing — patience, not surgery, brings it back, which is the heart of recovering from repotting shock.
To tell a wandering aerial root from a new flower spike, look at the tip. A root is blunt and rounded, tipped green or reddish, and heads off in any direction; a spike is flatter, mitten-shaped at the end, and climbs deliberately up toward the light.
Standard versus mini: same care, smaller pot
The difference between standard and mini Phalaenopsis orchids is mostly a matter of scale, not care. A mini is the same species in a smaller body and pot, so its light, its soak-then-dry rhythm, its humidity, and its cool-night bloom trigger are all identical to a full-size plant’s.
The one genuine difference is pace: a mini’s little cup of bark dries out faster, so it simply wants checking a touch sooner between soakings.
Both carry the same broad, dust-prone leaves, and a gentle wipe with a soft damp cloth doubles as an early pest sweep — exactly where a young colony of mealybugs gives itself away, the problem behind clearing mealybugs and scale.
How long it lives versus how long a bloom lasts
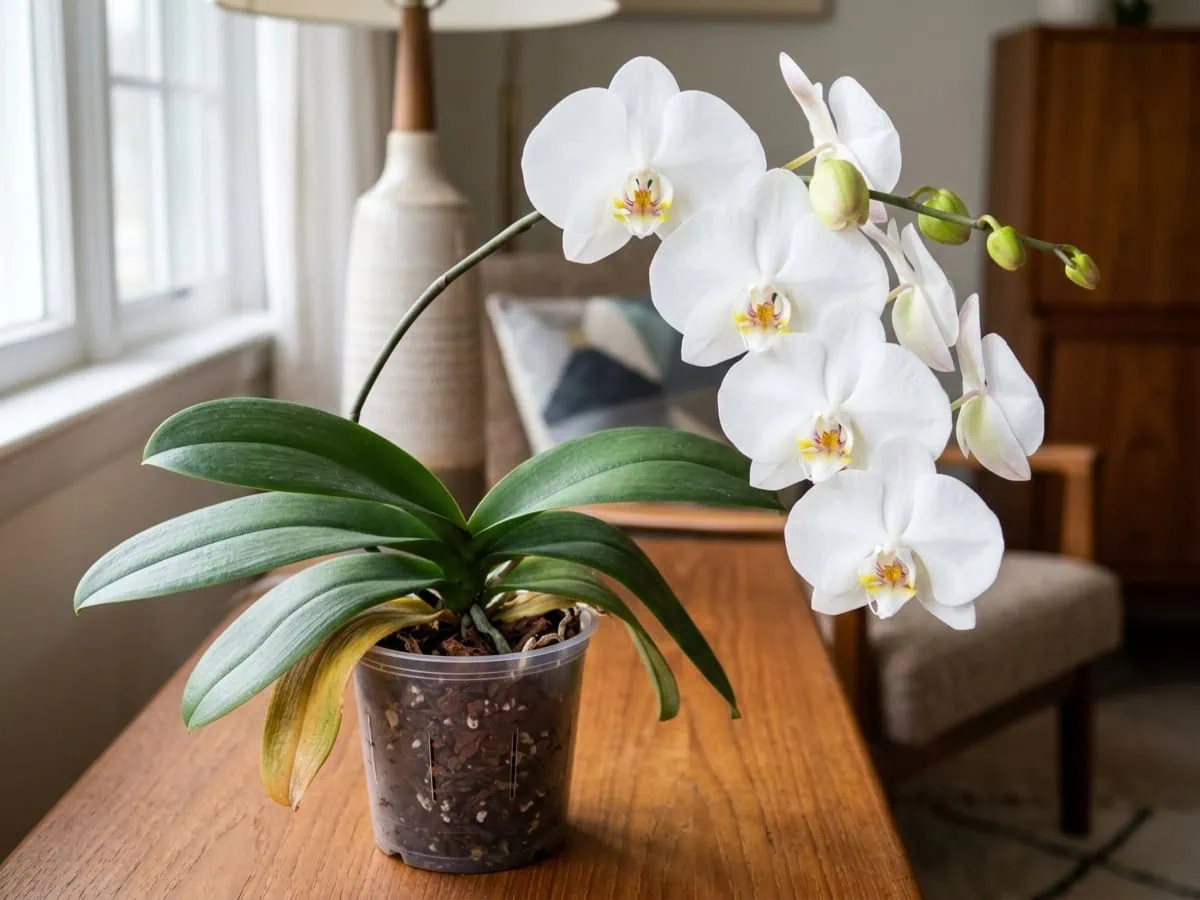
Three different clocks get tangled in the common question, how long do Phalaenopsis orchids live and bloom, so it pays to pull them apart. A single flush of flowers holds for roughly two to four months, sometimes longer under steady care.
The plant then reblooms on its own about once a year — more often for some hybrids — as long as it gets the light and cool nights covered above.
And the plant itself? It is a genuine long-lived perennial. Kept content, a moth orchid pushes a fresh leaf or two every year and keeps reblooming on that yearly rhythm, with no fixed lifespan to count down. The pace is slow.
You can even multiply one for nothing if it throws a keiki, a baby plantlet that forms right on the old spike, which is the whole story behind growing a keiki into a new plant.
Is a moth orchid safe around cats and dogs?
Yes — a moth orchid is safe around cats and dogs. If you have ever wondered, are Phalaenopsis orchids toxic to cats and dogs, the reassuring answer is no.
According to the ASPCA’s list of plants non-toxic to cats and dogs, a moth orchid has no toxic compound on file and is rated safe for cats, dogs, and even horses — a verdict three separate university extension services echo.
A curious nibble might bring on a little mild stomach upset, the same as chewing almost any houseplant would, but nothing worse. This is one flowering plant you can set on the living-room shelf, in easy reach of a nosy cat or a crawling baby, without a second thought.
Common moth orchid mistakes and myths to unlearn
Most moth orchids are lost to a handful of well-meaning mistakes, not to neglect. The two sections below take apart the myths that do the most lasting harm. These myths all sound reasonable.
The “low light is fine” myth that stops reblooming
The most damaging myth is that a moth orchid is a “low light” plant, happy in a dim corner. It tolerates low light, true — but tolerating and blooming sit worlds apart.
Starved of light, the plant lives on, leafy and green, while slowly lacking the energy to push even one flower spike, which is the real reason so many “healthy” orchids never bloom again.
Let the leaves tell you: a dark, blackish-green is the plant straining toward more light, not a badge of vigor. People misread those leaves the other way, too, watering a limp, wrinkled plant harder when the true fault is dead roots — the exact trap behind reading wrinkled, limp leaves.
The reading runs the other way just as often. A large tan or brown sunken patch with a chocolate-dark edge is the opposite trouble — a sunburn from too much direct sun, and unlike a light-starved leaf it never recovers or greens back.
Before you shift a stalled plant, name the signal you actually have: soft and evenly dark means give it more light; a hard, bleached, dead patch means pull it back from the glass.
- ❌ “Low light is fine.” ✅ It survives shade but only reblooms in bright, indirect light around 1,000–1,500 FC.
- ❌ “Water it with ice cubes.” ✅ Cold shocks these tropical roots; soak with tepid water instead.
- ❌ “Being root-bound makes it bloom.” ✅ Light and cool nights trigger blooming, never a crowded pot.
Ice cubes, soil, and the root-bound bloom myth
A few more habits do slow, lasting harm. Ice cubes look neat but jolt these warm-growing roots with a cold they never meet in the tropics; a thorough soak in tepid water is the honest stand-in.
Regular potting soil and peat smother the roots, as the bark section laid out, so they stay off the list for good. And being root-bound does not coax flowers — that crowding is a cue to repot into fresh bark, nothing more.
A few others deserve a flag. Water pooling in the crown — the central cup where new leaves unfurl — rots it from the inside out, so keep that hollow dry, especially overnight, and chase down any spreading dark patch with the steps for stopping rot at the central crown.
Not every dark mark is an emergency, though: a small, static black spot is often only cosmetic, while one that spreads and weeps points to identifying leaf-spot disease.
Do not over-read the lowest leaf, either: one bottom leaf slowly yellowing and dropping while the rest stay firm is ordinary aging on a monopodial plant — it is several going at once, or upper leaves, that point back to the roots.
The short, absolute don’t list comes down to this:
- Never let the pot stand in trapped water, and never use regular soil.
- Never water with ice cubes or cold water — tepid only.
- Never let water sit in the crown overnight.
- Never repot a plant in bloom, or cut firm, silver-green aerial roots.
- Never chase blooms with more fertilizer when the real lever is light.
Your moth orchid questions, answered
How do you care for a Phalaenopsis orchid indoors?
Water only when the bark nears dry, give bright indirect light, and keep it warm. In practice that means soaking roughly every 7 to 10 days and draining fully, supplying 1,000 to 1,500 foot-candles of bright indirect light, holding days at 70 to 80°F with nights down to 60 to 70°F, and keeping humidity near 50 to 60 percent. Feed weakly, and grow it in coarse bark rather than soil.
What to do with Phalaenopsis after flowering?
Once the flowers fade, decide whether to cut the spike or let it rest. If the spike stays green and the plant is strong, trim it just above the second node from the base to invite a second bloom in about 8 to 12 weeks. If the spike has browned, cut it off at the base so the plant pours its energy into fresh leaves and roots instead.
What to do when Phalaenopsis blooms fall off?
Flowers dropping after a long display is simply natural aging, not a fault to fix. A bloom that has lasted two to four months is finishing its normal run. If buds drop before they ever open, suspect a cold draft, a dry spell, or a sudden move instead. Either way, keep steady care going and the plant will spike again, usually within a year.
Where is the best place to put a Phalaenopsis orchid?
An east-facing window suits most homes best — strong morning light without harsh afternoon heat. A south or west window works if you soften it with a sheer curtain, while a north window usually needs a grow light to bloom. Above all, keep the plant clear of cold drafts, heating and cooling vents, and any glass cold enough to chill the leaves.
What are the common mistakes when caring for orchids?
Overwatering is the top mistake, trailed by too little light and watering with ice cubes. A constantly wet pot rots the roots, a dim corner stops the plant from blooming, and cold water shocks the warm-growing roots. Other slips include using regular soil, letting water pool in the central crown, and chasing flowers with extra fertilizer when the real fix is brighter light.
How long do Phalaenopsis orchids live indoors?
A well-kept moth orchid is a long-lived perennial with no fixed lifespan to count down. It grows slowly, adding a leaf or two each year while shedding its oldest, and reblooms roughly once a year. With steady light, careful watering, and fresh bark every couple of years, the same plant simply keeps going.
What’s the biggest mistake when repotting orchids?
The biggest repotting mistake is overpotting — moving the plant into too large a container. Excess bark holds water the roots cannot use, and that soggy dead zone rots them. Choose a pot that just fits the root mass, use fresh coarse bark rather than soil, and never repot while the plant is in bloom, since the disturbance makes it drop its flowers.
What do coffee grounds do for orchids?
Coffee grounds do more harm than good for orchids, so leave them out. They break down into a dense, water-holding layer that smothers the air-loving roots — the same way packed soil or peat does — and they can sour the bark and invite mold on a wet surface. A moth orchid feeds best on a weak, balanced orchid fertilizer at a quarter strength, not on kitchen scraps.
Do orchids like to stay wet or should I let them dry out before watering?
Let a moth orchid approach dry before each watering — never leave it sitting wet. Its roots are built to soak fast and then breathe in open air, so constant moisture suffocates and rots them. Wait until the bark is nearly dry and the roots fade to silver, then soak thoroughly and drain. Approach dry, though, not bone-dry, since the leaves hold the plant’s only real water reserve.
Are Phalaenopsis orchids hard to keep alive?
No — moth orchids are the easiest orchid to grow and forgiving of plenty of beginner slips. They rate as medium-maintenance overall, but the one make-or-break habit is simple: water only when the bark nears dry. Master that, give bright indirect light, and the plant nearly runs itself. Most “difficult” reputations trace straight back to overwatering, which the clear-pot, read-the-roots method solves.
Stop drowning your moth orchid, start reading its roots
If you keep just one idea from all of this, make it this — stop watering by the calendar and start reading the roots and the bark. A moth orchid is not fragile. Not even close.
It is honest, telling you through silver roots and firm, plump leaves exactly what it needs, as long as you slow down and look. Truth is — nearly every “difficult orchid” is just a drainage problem wearing a disguise.
So pick your next move. With the basics locked in, the natural next step is coaxing those flowers back through the cool-night trigger (there’s a deeper guide for exactly that).
When you’re ready, the second-bloom playbook picks up right where reliable Phalaenopsis orchid care leaves off. May your roots glow green after every soak, and your moth orchid spike again and again.
