🛠️ Quick Prep Summary: repotting a moth orchid
How to repot a Phalaenopsis orchid step by step comes down to timing. Wait until the last flower drops and fresh green root tips appear — never mid-bloom. The whole job takes under half an hour. Line up three things first, then work quickly so bare roots never dry out.
- The right moment: a finished flower spike and new root tips, never active bloom
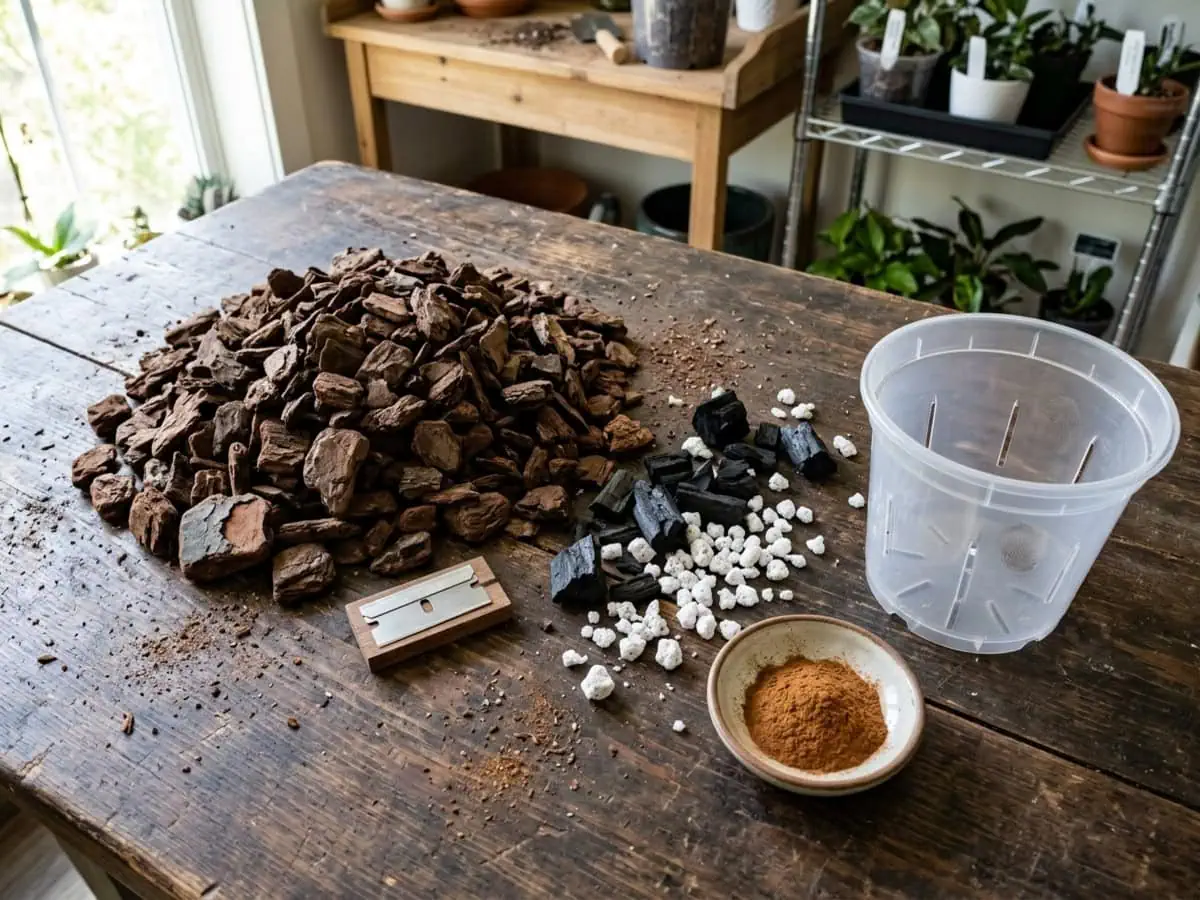
- One sterile blade: a fresh razor or shears wiped with 70% alcohol
- Fresh bark and a snug clear pot: medium-grade fir bark, only about one inch larger
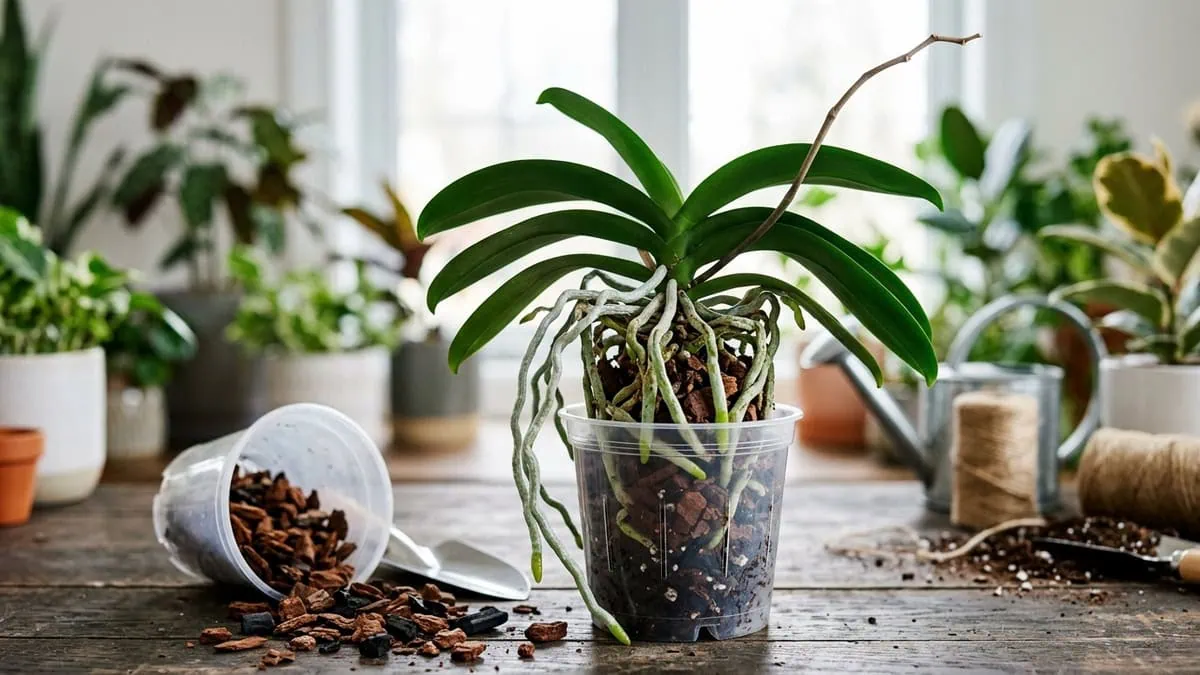
The first moth orchid I knocked out of its pot left brown mush across my palm — roots once firm and silver, now hollow and soft. Quick story: across three years I turned four healthy Phalaenopsis (still labeled Doritis at some shops; family Orchidaceae) to mush, each time by grabbing kitchen scissors and ramming the roots into dense, soggy bark.
Three years of that failure forced me to learn what plant tags never print. These are epiphytes — their velamen-wrapped roots, a spongy silver sheath that drinks water in seconds, need open air between soaks, like roots clinging to wild bark.
Pack them into wet, broken-down medium and they suffocate. Quietly, from the roots up.
Do it on the orchid’s terms and a repot becomes routine upkeep, not a gamble (note to self: the bark fails long before the plant does). For the wider care picture, start with the moth orchid care walkthrough.
Take a breath before you dig in — the orchid is tougher than it looks. The following table lays out every spec you need at a glance.
How to repot a Phalaenopsis orchid step by step — quick specs
| Moth orchid specs | Recommended care |
|---|---|
| Difficulty | Low to medium — good for a first-time repotter |
| Time needed | Roughly 20–40 minutes |
| When to repot | After the last bloom drops and new roots emerge; never in flower |
| Pot | Clear plastic with drainage holes, only about 1 inch larger |
| Medium | Medium-grade fir bark, charcoal, and perlite (roughly 5:1:1) |
| Tools | Sterile blade or shears; ground cinnamon for trimmed-root cuts |
| Does it need a clear pot with holes? | Yes — drainage is required, clear is recommended |
| Can a moth orchid be divided at repotting? | No — it is monopodial, so it is never split |
Table of Contents
Before you start: timing, tools, and the right pot
Three things decide whether this goes smoothly: the timing, a sterile blade, and the pot-and-bark pairing. The following sections cover each.
When to repot: after the bloom, never in flower
Repot only after the last flower has dropped and fresh, bright-green root tips are pushing out — never while the plant is in bloom. That is the real answer to when is the right time to repot a Phalaenopsis orchid: read the plant, not the calendar. Cut roots re-establish fastest during this active-growth window, while a plant disturbed in full bloom will simply drop every flower it is carrying, wasting the whole display.
The trigger is the bark, not the season. Watch for three go-signals:
- The last flower has faded and the spike is spent.
- New, glossy root tips are emerging at the base.
- The bark has crumbled into a soggy, soil-like paste that no longer drains.
Pot ~1 inch larger, clear, with drainage
Drainage holes are mandatory. A clear pot is the strongly recommended upgrade, and the short answer to do Phalaenopsis orchids need clear pots with holes is yes on both counts.
A clear wall earns its keep two ways, and a snug fit does the rest:
- Read the roots: silver means dry, green means freshly watered.
- Feed the roots: light reaches the photosynthetic root surface.
- Stay snug: moth orchids bloom best slightly pot-bound, so move up only one inch, never two or three.
An oversized pot traps a wide collar of wet, rootless bark that sours, goes airless, and suffocates the roots long before they grow out to fill it. If the inner pot sits in a decorative cachepot, tip out any water that pools — never let it stand. Empty it every time.
Medium-grade bark, charcoal, sterile tools
Medium-grade fir bark, roughly a quarter to a half inch across, is the right particle size for a moth orchid. That settles what size orchid bark chunks work best for a Phalaenopsis — medium grade, never fine potting bark. Particle size sets the air-to-water ratio: big chunks keep the open channels these velamen roots breathe through, while fine bark closes them. Aeration is the whole game.
In my own repots, the fine grade I started with packed down and held water like soil within a few months; the half-inch chunks held their open structure far longer. Per Clemson Cooperative Extension, a reliable orchid potting medium and repotting mix combines fir bark, charcoal, and sponge rock or perlite. I blend mine at roughly five parts bark to one part each:
- Fir bark (about five parts) — the airy backbone.
- Horticultural charcoal (one part) — a salt buffer; a chalky white film on top means it is saturated.
- Sponge rock or perlite (one part) — extra drainage.
Use only horticultural charcoal. Then reach for a sterile blade, wiped with 70% alcohol before you start and between every cut.
Step by step: unpot, inspect roots, repot
With prep done, the repot runs in four calm moves. The following steps take you from a stuck pot to a freshly seated plant.
Step 1: Soak and ease the plant out
Soak the whole rootball in tepid water for a few minutes before you touch a single root. Bone-dry velamen is stiff and brittle as dry spaghetti; a quick soak turns it rubbery and bendable, so the roots flex instead of snapping when you free them.
Then grip the plant low on the stem. Ease it out slowly. If it is badly pot-bound, sacrifice the pot — cut or crack it — rather than tear living roots loose.
Step 2: Read roots by firmness, trim only dead
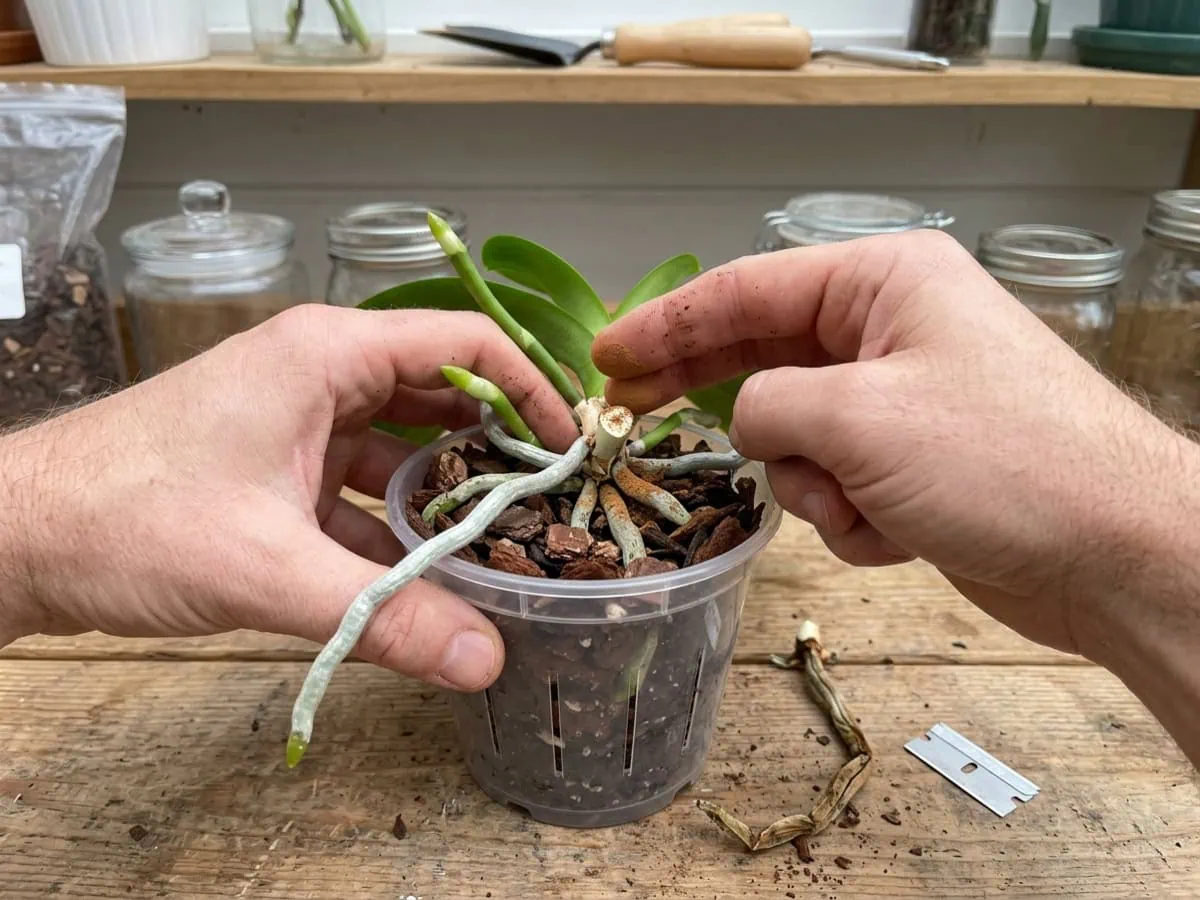
Judge every root by firmness, not color — that one habit saves more healthy roots than any tool you own. Tell them apart by touch:
- Alive: firm and plump, silver-white when dry, bright green just after a soak.
- Dead: hollow, flat, or wiry, collapsing like an empty drinking straw under light pressure.
Cut only the dead ones. Sterilize the blade between cuts. One question comes up constantly: should I trim Phalaenopsis aerial roots before repotting? The answer is no. Leave every firm aerial root intact and outside the bark; they feed the plant. Pull one only when it is hollow or rotted, never just to tidy the pot.
If much of the rootball has gone to mush, you have crossed from routine repotting into rescue work, and the same firmness test guides trimming rotted roots during a repot.
Step 3: Settle the crown at the surface
Set the crown — where the stem meets the roots — at the bark surface, never buried. The base of the lowest leaf should sit just above the rim. Spread a thin layer of fresh bark across the pot bottom first. Center the plant. Slide the roots down to that height.
Water pools in a buried crown and rots it, and any extra depth just parks wet, rootless bark under the plant where it suffocates new growth. Work chunky, dry bark that rattles like fine gravel into the gaps, pressing gently so no air pockets remain. Keep the foliage clear.
Keep every cut clean and cold-free. Sterilize your blade between cuts, and dust each trimmed root edge with a pinch of ground cinnamon — a gentle antifungal that seals the wound. Never pour hydrogen peroxide on living roots, crown, or leaves; it belongs only on empty pots and tools.
When you water, use tepid water only — ice cubes and cold tap water shock these warm-tropical roots and the crown, and that chill can trigger rot.
Always test on a small area first. Results may vary depending on your specific conditions.
Step 4: First watering — tepid, never ice
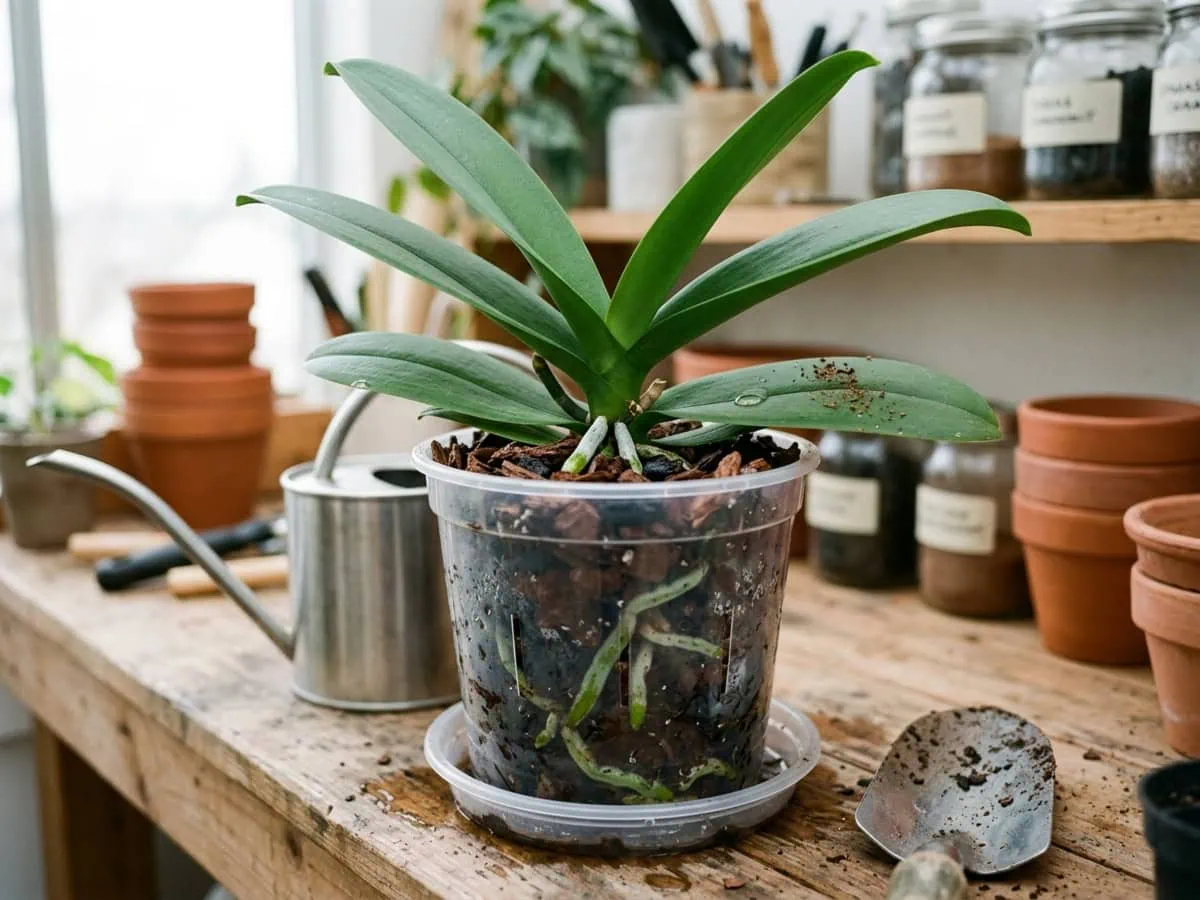
Water it in straight away with tepid, room-temperature water, ideally in the morning so the leaves dry by nightfall. Fresh bark repels water at first, so flood the pot two or three times, letting it drain fully between passes until the chunks darken and hold moisture.
Tip out the saucer. The plant must never stand in water. Keep water out of the crown and the new central leaf, where it pools and rots. From here the plant eases back into its normal rhythm — pick that up in the watering rhythm afterward.
After the repot: the no-fertilizer pause and myths to skip
Right after a repot, your moth orchid needs less from you, not more. The following pointers cover the feeding pause, the myths that trip up new repotters, and the one soil emergency that overrides every rule.
Hold fertilizer about a month after a repot
Hold all fertilizer for about a month after repotting, and stretch that to two or three months if you trimmed away a lot of root. Fertilizer is just salt, and salt scorches the tender new root tips the plant is busy growing; a potassium overload shows up first as blackened tips. The one time I fed a freshly trimmed plant early, the new tips went black within a week.
Wait for fresh tips. Then feed at quarter strength. The full feeding schedule, including how to flush built-up salts, lives in my guide on when to resume feeding.
Myths: repot anytime, divide it, ice it
Three pieces of internet advice wreck more first repots than any real technique mistake. Skip all three:
- “Repot anytime.” Never repot a plant in full bloom — the stress makes it drop every flower. Wait for the spike to finish first.
- “Divide it like other orchids.” A moth orchid is monopodial: one upward-growing crown, no pseudobulbs, no creeping rhizome to split. The division steps in generic orchid guides are written for sympodial types and will only damage your plant. Center the single plant and never cut the stem to multiply it.
- “Water it with ice cubes.” Cold shocks warm-tropical roots and the crown, and a few cubes deliver far too little water anyway. Give it a tepid soak instead.
Every one of these myths ignores how this particular orchid is actually built.

Potted in regular soil? Repot out promptly
If your moth orchid is sitting in ordinary potting soil or peat, repot it into open bark right away, because the wrong medium is itself the emergency that will not wait. That is precisely what to do if my Phalaenopsis was potted in regular soil: act now, do not wait for a calendar window. Dense, water-holding soil smothers velamen roots, choking off the air they need until they rot. Soil is the trap.
Work fast and gentle:
- Unpot it and rinse every crumb of soil off the roots.
- Trim anything mushy with a sterile blade.
- Settle it into fresh, open bark at the right depth.
One reassurance: a healthy plant repotted correctly rarely struggles. The real setbacks come from repotting in bloom or losing more than half the roots. Expect a week or two of mild settling. Not a crash. Watch for fresh green root tips pushing into the new bark — that is your sign the rescue took.
Common questions about repotting a moth orchid
How to repot Phalaenopsis orchids for beginners?
Repot a moth orchid right after its flowers drop, when fresh green root tips appear. Soak the rootball, ease the plant out, and rinse off the old bark. Trim only the hollow or mushy roots with a sterile blade, then dust the cuts with ground cinnamon. Settle the plant in fresh medium-grade bark with the crown right at the surface, and water it with tepid water. Out of bloom the job is forgiving, which is part of why the moth orchid is so often called the easiest orchid to start with.
Do Phalaenopsis orchids like small pots?
Yes. Moth orchids root and bloom best when kept slightly pot-bound in a snug pot. A container that just holds the existing root mass keeps the bark from staying soggy in empty, rootless pockets, which is exactly where rot begins. When you do size up, move only about one inch larger in diameter, never two or three. Bigger is not better for an epiphyte; an oversized pot simply holds more water than the roots can ever use.
Do orchids prefer shallow or deep pots?
Pot depth matters far less than where the crown sits. Choose a pot that holds the root mass snugly and keeps the base of the lowest leaf at or just above the surface. A deep pot only stacks wet, rootless medium beneath the plant, where it stays soggy and invites rot. Most growers do best with a standard, slightly shallow orchid pot — the priorities are drainage holes and a snug fit, not extra depth.
What month is best to repot orchids?
Forget the calendar — repot when the plant signals it, not when a month does. The window opens once the last flower has dropped and you see fresh green root tips pushing out, during the warmer, brighter part of the growth cycle. Never repot a moth orchid in full bloom, since the stress makes it shed its flowers. If the bark has crumbled into a soggy, soil-like paste, that breakdown is your real signal, whatever the month reads.
The 4-move repotting protocol, start to finish
Strip the panic out of repotting and four calm moves are all that remain: soak and lift, read the roots by firmness, settle the crown at the surface, and water tepid.
Do them in order, out of bloom. That’s the whole trick. Your moth orchid barely registers the change.
The plant is built to be handled — its velamen roots regrow fast once they are back in airy bark. So if yours sulks for a week or two afterward, do not panic; that is normal settling, and here is exactly what to do if it struggles after the repot.
Get the timing and the medium right, and that is genuinely all there is to how to repot a Phalaenopsis orchid step by step. May your roots stay silver-firm and your next spike arrive right on schedule.
